<?xml version="1.0" encoding="utf-8"?><feed xmlns="http://www.w3.org/2005/Atom" ><generator uri="https://jekyllrb.com/" version="3.10.0">Jekyll</generator><link href="jonjam.github.io/blog/feed.xml" rel="self" type="application/atom+xml" /><link href="jonjam.github.io/blog/" rel="alternate" type="text/html" /><updated>2026-10-02T08:13:18+00:00</updated><id>jonjam.github.io/blog/feed.xml</id><title type="html">JonJam // Side Quests</title><subtitle>Engineering notes, experiments and the occasional gaming obsession.</subtitle><author><name>Jonathan Harrison</name></author><entry><title type="html">High Coverage, Low Confidence: What Mutation Testing Reveals About AI-Generated Tests</title><link href="jonjam.github.io/blog/2026/06/12/high-coverage-low-confidence-what-mutation-testing-reveals-about-ai-generated-tests.html" rel="alternate" type="text/html" title="High Coverage, Low Confidence: What Mutation Testing Reveals About AI-Generated Tests" /><published>2026-06-12T00:00:00+00:00</published><updated>2026-06-12T00:00:00+00:00</updated><id>jonjam.github.io/blog/2026/06/12/high-coverage-low-confidence-what-mutation-testing-reveals-about-ai-generated-tests</id><content type="html" xml:base="jonjam.github.io/blog/2026/06/12/high-coverage-low-confidence-what-mutation-testing-reveals-about-ai-generated-tests.html"><![CDATA[<p><img src="/blog/assets/images/2026-06-12-high-coverage-low-confidence-what-mutation-testing-reveals-about-ai-generated-tests-3bg4-ig4yplum6p05myce37g9.png" alt="High Coverage, Low Confidence: What Mutation Testing Reveals About AI-Generated Tests" /></p>

<p>AI coding agents can now generate code and tests in seconds.</p>

<p>That’s useful — but it also creates a problem we don’t talk about enough:</p>

<blockquote>
  <p>We can have high test coverage and passing tests … without actually having meaningful tests.</p>
</blockquote>

<p>I recently ran into this at work on JavaScript projects where the code looks well-tested, CI is green and coverage is high.</p>

<p>Then I added mutation testing.</p>

<p>Everything changed.</p>

<h2 id="what-is-mutation-testing">What is mutation testing?</h2>

<p>Mutation testing is a way of checking whether your tests actually detect bugs.</p>

<p>It works by introducing small, deliberate changes (called mutants) into your code, such as:</p>

<ul>
  <li>changing &gt; to &gt;=</li>
  <li>flipping conditions</li>
  <li>modifying return values</li>
  <li>removing logic</li>
</ul>

<p>Then it runs your test suite.</p>

<p>Two outcomes:</p>

<ul>
  <li>Tests fail → the mutant is killed</li>
  <li>Tests pass → the mutant survives</li>
</ul>

<p>If mutants survive, it means your tests didn’t catch a real change in behavior.</p>

<p>In short:</p>

<blockquote>
  <p>Mutation testing tells you whether your tests are actually doing their job.</p>
</blockquote>

<p><img src="/blog/assets/images/2026-06-12-high-coverage-low-confidence-what-mutation-testing-reveals-about-ai-generated-tests-3bg4-a4qu8ttakmnhtkfj77sd.png" alt="Meme depicting mutation testing" /></p>

<h2 id="why-this-matters-in-the-ai-agent-era">Why this matters in the AI agent era</h2>

<p>AI tools are great at generating tests quickly.</p>

<p>But those tests often:</p>

<ul>
  <li>cover happy paths only</li>
  <li>miss edge cases</li>
  <li>contain weak assertions</li>
  <li>verify implementation details rather than results</li>
</ul>

<p>This leads to a dangerous mismatch:</p>

<ul>
  <li>High coverage ✔️</li>
  <li>Passing tests ✔️</li>
  <li>Real confidence ❌</li>
</ul>

<p>Mutation testing helps close that gap.</p>

<p>It answers a better question:</p>

<blockquote>
  <p>“Would these tests actually catch a bug?”</p>
</blockquote>

<h2 id="mutation-testing-in-a-real-java-project-pit--gradle">Mutation testing in a real Java project (PIT + Gradle)</h2>

<p>I integrated <a href="https://pitest.org/">PIT</a>⁠ into a <a href="https://github.com/JonJam/accuweather-mcp">Gradle-based Java project</a> that already used JUnit and JaCoCo.</p>

<p>Setup is straightforward:</p>

<div class="language-groovy highlighter-rouge"><div class="highlight"><pre class="highlight"><code><span class="n">plugins</span> <span class="o">{</span>
    <span class="n">id</span> <span class="s1">'info.solidsoft.pitest'</span> <span class="n">version</span> <span class="s1">'1.19.0'</span>
<span class="o">}</span>

<span class="n">pitest</span> <span class="o">{</span>
    <span class="n">targetClasses</span> <span class="o">=</span> <span class="o">[</span><span class="s1">'com.jonjam.accuweathermcp.*'</span><span class="o">]</span>
    <span class="n">mutators</span> <span class="o">=</span> <span class="o">[</span><span class="s1">'STRONGER'</span><span class="o">]</span>
    <span class="n">junit5PluginVersion</span> <span class="o">=</span> <span class="s1">'1.2.3'</span>
    <span class="n">outputFormats</span> <span class="o">=</span> <span class="o">[</span><span class="s1">'HTML'</span><span class="o">,</span> <span class="s1">'XML'</span><span class="o">]</span>
    <span class="n">mutationThreshold</span> <span class="o">=</span> <span class="mi">70</span>
<span class="o">}</span>
</code></pre></div></div>

<p>Run it with:</p>

<div class="language-bash highlighter-rouge"><div class="highlight"><pre class="highlight"><code>./gradlew pitest
</code></pre></div></div>

<h2 id="what-the-results-showed">What the results showed</h2>

<p>On paper, the test suite already looked solid:</p>

<ul>
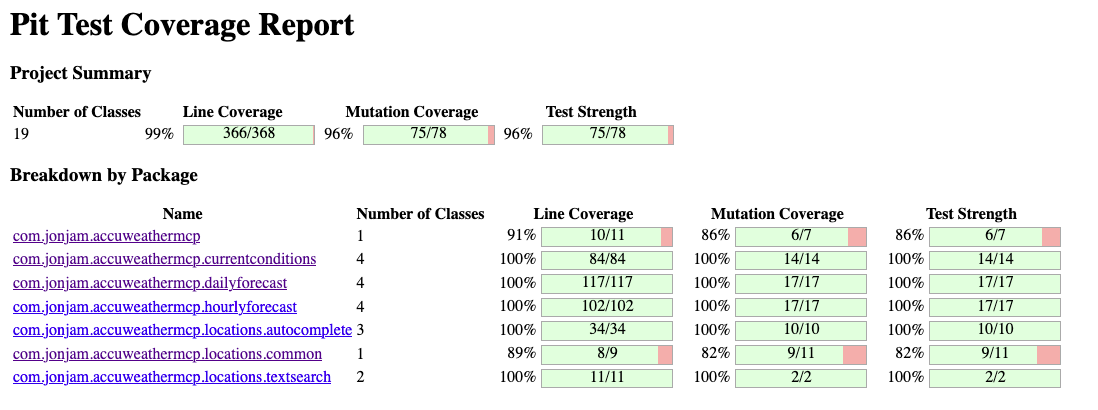
  <li>99% line coverage (366/368 lines)</li>
  <li>96% mutation coverage (631/703 mutants killed)</li>
</ul>

<p>But mutation testing tells a deeper story.</p>

<p>Coverage answers:</p>

<blockquote>
  <p>“Did we execute the code?”</p>
</blockquote>

<p>Mutation testing answers:</p>

<blockquote>
  <p>“Would a test fail if the code was wrong?”</p>
</blockquote>

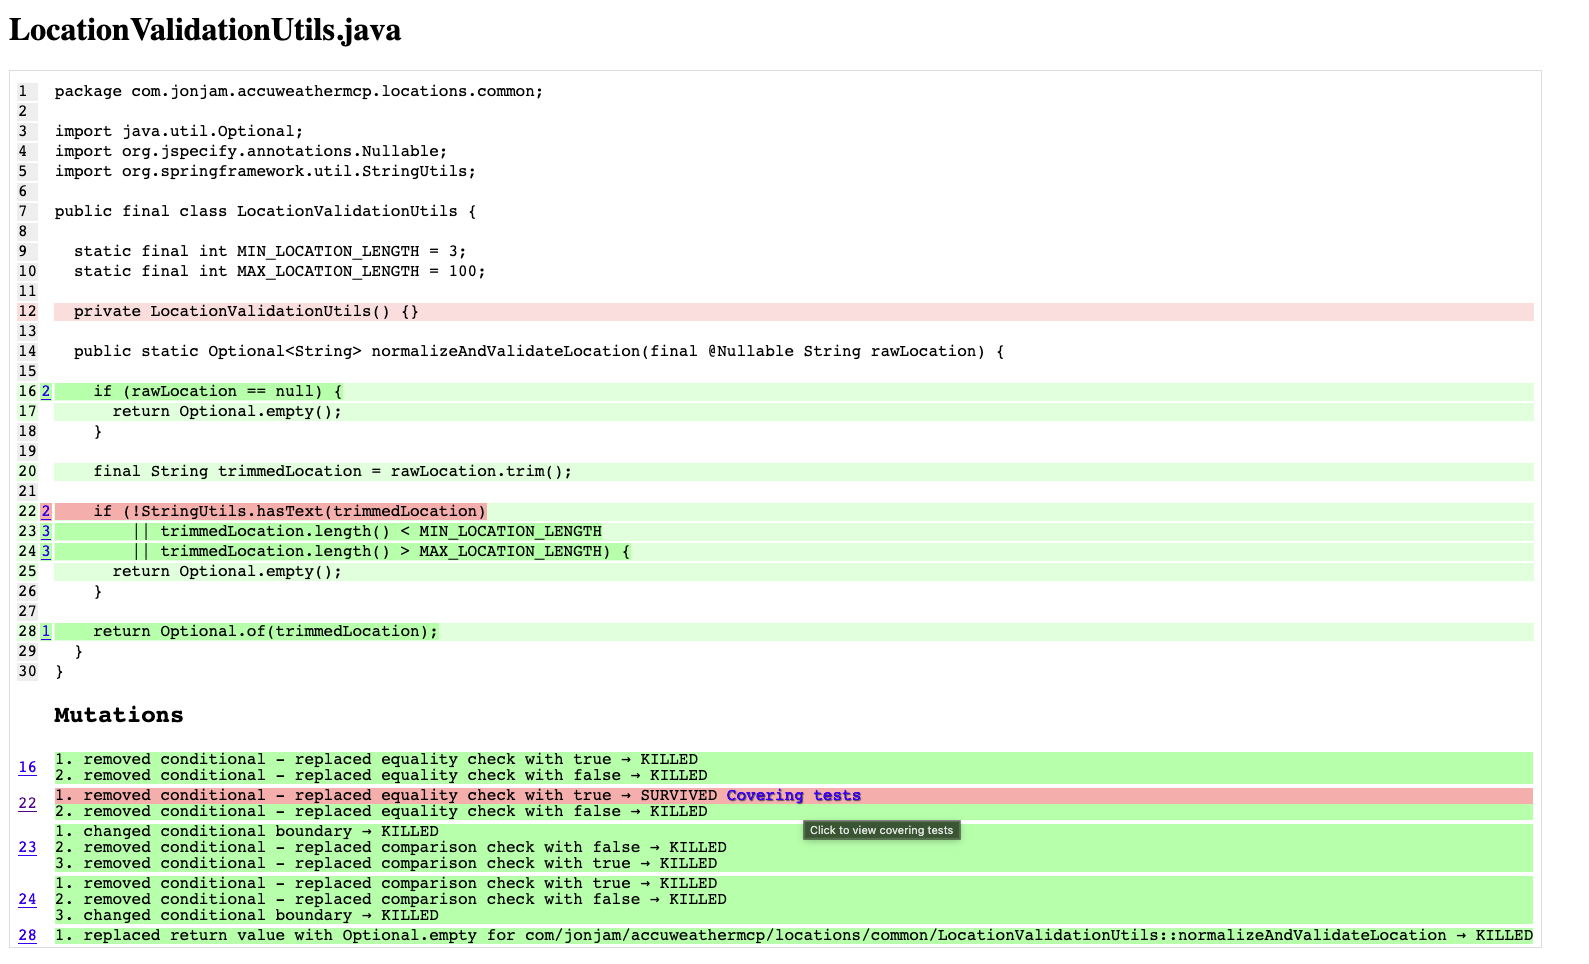
<p>The surviving mutants highlighted cases where:</p>

<ul>
  <li>code was executed but not properly asserted</li>
  <li>edge cases were missing</li>
  <li>tests were too implementation-focused</li>
</ul>

<p>That’s the key insight:</p>

<p>High coverage ≠ strong tests</p>

<p><img src="/blog/assets/images/2026-06-12-high-coverage-low-confidence-what-mutation-testing-reveals-about-ai-generated-tests-3bg4-8sl2mqm9gf7nq4woo9ir.png" alt="Mutation testing report depicting a java project" /></p>

<p><img src="/blog/assets/images/2026-06-12-high-coverage-low-confidence-what-mutation-testing-reveals-about-ai-generated-tests-3bg4-49wdkwig1i08cl8ny201.png" alt="Mutating testing report for a single Java class showing surviving mutants" /></p>

<h2 id="a-simple-example-surviving-mutants">A simple example: surviving mutants</h2>

<p>Here’s a basic example of what PIT is catching:</p>

<div class="language-java highlighter-rouge"><div class="highlight"><pre class="highlight"><code><span class="c1">// original</span>
<span class="k">if</span> <span class="o">(</span><span class="n">temperature</span> <span class="o">&gt;</span> <span class="mi">30</span><span class="o">)</span> <span class="o">{</span>
    <span class="k">return</span> <span class="s">"hot"</span><span class="o">;</span>
<span class="o">}</span>

<span class="c1">// mutant</span>
<span class="k">if</span> <span class="o">(</span><span class="n">temperature</span> <span class="o">&gt;=</span> <span class="mi">30</span><span class="o">)</span> <span class="o">{</span>
    <span class="k">return</span> <span class="s">"hot"</span><span class="o">;</span>
<span class="o">}</span>
</code></pre></div></div>

<p>If your tests only check broad behavior like:</p>

<ul>
  <li>“above 30 is hot”</li>
  <li>“below 30 is not hot”</li>
</ul>

<p>…then both versions pass.</p>

<p>That mutant survives.</p>

<p>And that’s the point: your tests didn’t actually detect a meaningful change.</p>

<h2 id="turning-mutation-testing-into-an-ai-feedback-loop">Turning mutation testing into an AI feedback loop</h2>

<p>The most interesting part of this experiment wasn’t the tool—it was the workflow.</p>

<p>I ended up using mutation testing as a loop for improving AI-generated tests:</p>

<ol>
  <li>Run PIT</li>
  <li>Inspect surviving mutants</li>
  <li>Strengthen or add targeted tests</li>
  <li>Remove weak or redundant tests</li>
  <li>Re-run until confidence improves</li>
</ol>

<p>This turns testing into something more dynamic:</p>

<blockquote>
  <p>not just generating tests, but continuously improving them based on real failure signals</p>
</blockquote>

<p>It also works well with AI agents:</p>

<ul>
  <li>AI generates initial tests</li>
  <li>PIT evaluates them</li>
  <li>AI iterates based on feedback</li>
</ul>

<p>The above being wrapped up in an Agent skill.</p>

<h2 id="why-this-matters">Why this matters</h2>

<p>In a world where AI can generate tests instantly, the bottleneck is no longer writing tests.</p>

<p>It’s trusting them.</p>

<p>We need better signals than:</p>

<ul>
  <li>“tests pass”</li>
  <li>“coverage is high”</li>
</ul>

<p>Mutation testing gives us that signal.</p>

<p>It tells us whether our tests would actually catch broken behaviour.</p>

<h2 id="closing-thought">Closing thought</h2>

<p>If you’re already using line coverage tools like JaCoCo, mutation testing is the next step up in confidence.</p>

<p>It shifts the question from:</p>

<blockquote>
  <p>“Do we have tests?”</p>
</blockquote>

<p>to</p>

<blockquote>
  <p>“Would these tests catch a real bug?”</p>
</blockquote>

<p>And in the age of AI-generated tests, that difference matters more than ever.</p>]]></content><author><name>Jonathan Harrison</name></author><category term="ai" /><category term="java" /><category term="testing" /><category term="mutation-testing" /><summary type="html"><![CDATA[Why high test coverage does not necessarily mean strong tests, and how mutation testing can reveal weaknesses in AI-generated test suites.]]></summary></entry><entry><title type="html">Agentic development in practice: Building a weather MCP server with Spring AI and Cursor</title><link href="jonjam.github.io/blog/2026/03/31/weather-mcp.html" rel="alternate" type="text/html" title="Agentic development in practice: Building a weather MCP server with Spring AI and Cursor" /><published>2026-03-31T00:00:00+00:00</published><updated>2026-03-31T00:00:00+00:00</updated><id>jonjam.github.io/blog/2026/03/31/weather-mcp</id><content type="html" xml:base="jonjam.github.io/blog/2026/03/31/weather-mcp.html"><![CDATA[<p><img src="/blog/assets/images/2026-03-31-weather-mcp-1idj-gzsitzbinekyfscgag12.png" alt="Agentic development in practice: Building a weather MCP server with Spring AI and Cursor" /></p>

<h2 id="introduction">Introduction</h2>

<p>At the beginning of 2026, the UK was experiencing an <a href="https://www.metoffice.gov.uk/blog/2026/how-much-rain-have-we-had-in-february-and-winter">unusually wet start</a> — something that seemed to dominate everyday conversation. That got me thinking:</p>

<p>Why shouldn’t AI agents be able to join in too?</p>

<p>So I set out to build a weather-powered <a href="https://modelcontextprotocol.io/docs/getting-started/intro">Model Context Protocol (MCP) server</a> using <a href="https://spring.io/projects/spring-ai">Spring AI</a>, developed with <a href="https://cursor.com/home">Cursor agents</a>.</p>

<p>Along the way, I got to explore agentic development, learn new tooling, and solve a few unexpected challenges.</p>

<h2 id="what-i-built">What I built</h2>

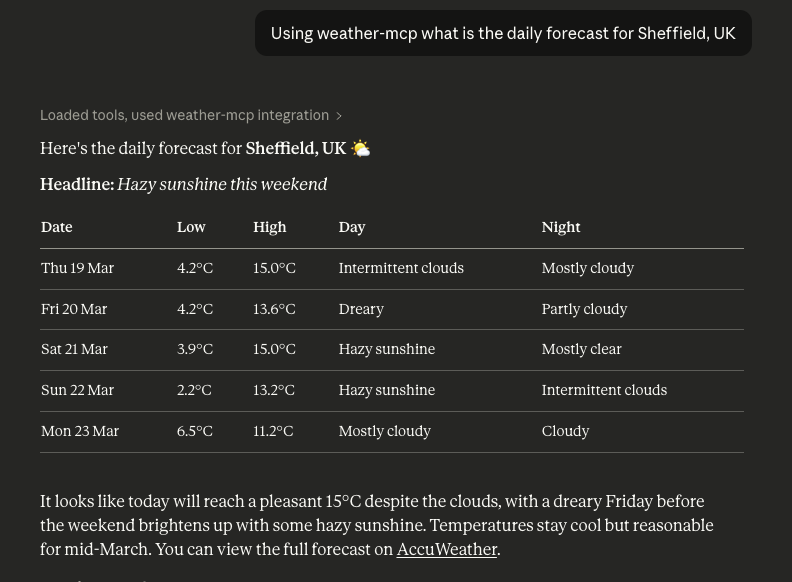
<p>I built an <a href="https://www.accuweather.com/">Accuweather</a>-powered MCP server that enables AI agents to query:</p>

<ul>
  <li>Current weather</li>
  <li>Hourly forecasts</li>
  <li>Daily forecasts</li>
</ul>

<p><img src="/blog/assets/images/2026-03-31-weather-mcp-1idj-7g31dhj768s2bqxcxk22.png" alt="A screenshot of the weather forecast for Sheffield, United Kingdom within Claude" /></p>

<p>The server is published on the <a href="https://registry.modelcontextprotocol.io/?q=io.github.JonJam%2Faccuweather-mcp">official MCP Registry</a> and can be integrated into tools like Claude.</p>

<p>This allows LLMs to access structured, real-time weather data via tools—rather than relying on potentially outdated or hallucinated responses.</p>

<h2 id="how-it-works">How it works</h2>

<p>The MCP server exposes weather functionality as tools that AI agents can call via the Model Context Protocol.</p>

<p>At a high level:</p>

<ul>
  <li>Spring AI handles MCP integration and tool definitions</li>
  <li>The server communicates with the AccuWeather API</li>
  <li>MCP tools are exposed using annotations</li>
  <li>AI agents (e.g. Claude) invoke these tools via structured requests</li>
</ul>

<p>This architecture allows the model to fetch live data when needed, making responses more accurate and reliable.</p>

<h2 id="how-i-got-up-to-speed">How I got up to speed</h2>

<h3 id="cursor">Cursor</h3>

<p>Cursor provides excellent resources for getting started with agentic development that includes plenty of guidance, recommendations and best practises.</p>

<ul>
  <li><a href="https://cursor.com/docs">Docs</a></li>
  <li><a href="https://cursor.com/learn">Courses</a></li>
  <li><a href="https://cursor.com/workshops">Workshops</a></li>
</ul>

<h3 id="model-context-protocol">Model Context Protocol</h3>

<p>If you’re new to MCP, the <a href="https://modelcontextprotocol.io/docs/getting-started/intro">official documentation</a> is a great starting point.</p>

<p>I’d also strongly recommend reading the specification itself — it covers important details like:</p>

<ul>
  <li>Error handling</li>
  <li>Security considerations</li>
  <li>Implementation patterns</li>
</ul>

<h3 id="spring-ai">Spring AI</h3>

<p>The <a href="https://docs.spring.io/spring-ai/reference/index.html">Spring AI reference documentation</a> provides solid guidance on MCP and broader Generative AI concepts such as chat clients and RAG.</p>

<p>One of the most useful resources was the <a href="https://github.com/spring-projects/spring-ai-examples">examples repository</a>, which demonstrates how everything fits together—particularly how to use <a href="https://docs.spring.io/spring-ai/reference/api/mcp/mcp-annotations-overview.html">MCP annotations</a> to define tools.</p>

<h2 id="gotchas">Gotchas</h2>

<p>These were the issues that slowed me down the most and are likely to help others building something similar.</p>

<h3 id="cursor-1">Cursor</h3>

<p>My goal for this project was to lean into agentic development and minimise hand-written code.</p>

<p>Initially, I tried a one-shot approach: generating a full plan and letting the agent implement the feature. It worked—but produced far more code than I wanted, and used patterns I wouldn’t normally choose.</p>

<p>To improve this, I made a few changes:</p>

<ul>
  <li><strong>Added guard rails</strong>: Unit and integration tests, code formatting with <a href="https://github.com/diffplug/spotless">spotless</a>, code analysis using <a href="https://checkstyle.org/">checkstyle</a></li>
  <li><strong>Incremental rule creation</strong>: Whenever the agent made a mistake (e.g. using Maven instead of Gradle, or missing <a href="https://jspecify.dev/">JSpecify</a> nullability annotations), I added rules to <a href="https://github.com/JonJam/accuweather-mcp/blob/main/AGENTS.md">AGENTS.md</a></li>
  <li><strong>Used Plan mode and auto model selection</strong>: This helped optimise usage and extend the limits of the Hobby plan.</li>
  <li><strong>Develop in increments</strong>: Instead of building full features in one go, I broke them into layers: HTTP client, Gateway and MCP tool. This made it easier to review and course-correct.</li>
  <li><strong>Referenced existing code</strong>: Once patterns were established, I used them as examples to guide the agent.</li>
</ul>

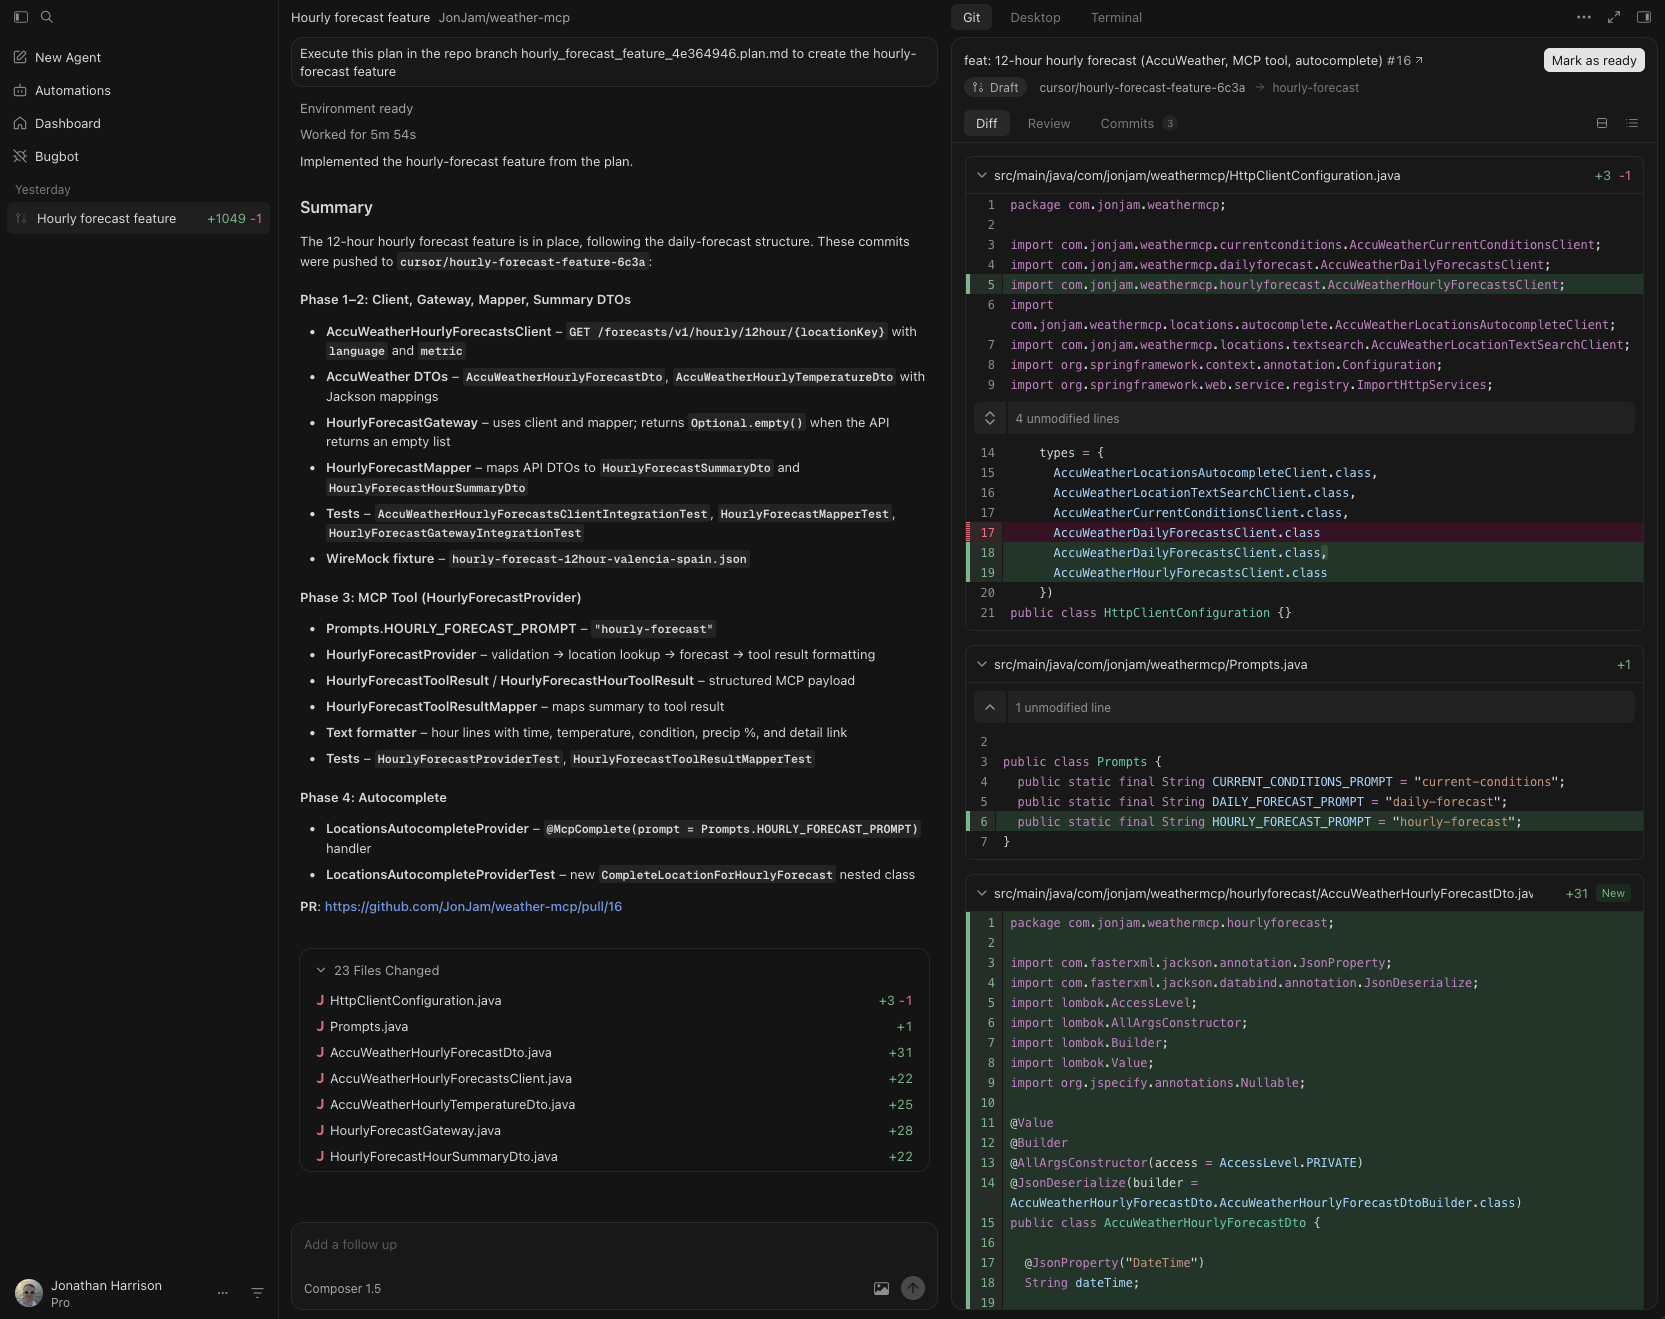
<p>By the time I implemented the hourly forecast feature, I was able to generate a <a href="https://github.com/JonJam/accuweather-mcp/blob/main/.cursor/plans/hourly_forecast_feature_4e364946.plan.md">plan</a> and delegate execution to a Cloud Agent—only needing to review the result.</p>

<p><img src="/blog/assets/images/2026-03-31-weather-mcp-1idj-jr7w9oh6i3odvfx1zouh.png" alt="A screenshot of the output produced by a Cursor Cloud Agent when building the hourly forecast feature" /></p>

<h3 id="spring-ai-1">Spring AI</h3>

<p>A few things weren’t immediately obvious from the docs:</p>

<ul>
  <li><strong>Turn off console logging</strong>: MCP servers using stdio must only output JSON-RPC messages. Any logging to stdout will <a href="https://modelcontextprotocol.io/docs/develop/build-server#logging-in-mcp-servers-3">break the integration with an MCP client</a>.</li>
</ul>

<div class="language-yaml highlighter-rouge"><div class="highlight"><pre class="highlight"><code><span class="na">logging</span><span class="pi">:</span>
  <span class="na">console</span><span class="pi">:</span>
    <span class="na">enabled</span><span class="pi">:</span> <span class="no">false</span>
</code></pre></div></div>

<ul>
  <li>
    <p><strong>MCP Server annotations</strong>: To use <a href="https://docs.spring.io/spring-ai/reference/api/mcp/mcp-annotations-server.html">MCP Server Annnotatons</a> which simplifies the creation of MCP server functionality like tools, you need to include the <code class="language-plaintext highlighter-rouge">org.springframework.ai:spring-ai-mcp-annotations</code> dependency and import them from <code class="language-plaintext highlighter-rouge">org.springaicommunity.mcp.annotation.*</code>.</p>
  </li>
  <li>
    <p><strong>Debugging with MCP Inspector</strong>: If you want to use the <a href="https://modelcontextprotocol.io/docs/tools/inspector">MCP Inspector</a> to debug your MCP server, use the following command:</p>
  </li>
</ul>

<div class="language-bash highlighter-rouge"><div class="highlight"><pre class="highlight"><code>npx @modelcontextprotocol/inspector <span class="nt">-e</span> <span class="s1">'JAVA_TOOL_OPTIONS=-agentlib:jdwp=transport=dt_socket,server=y,suspend=n,address=*:5005'</span> java <span class="nt">-jar</span> <span class="s2">"build/libs/accuweather-mcp-local-snapshot.jar"</span>
</code></pre></div></div>

<ul>
  <li><strong>Testing with Claude</strong>: If you want to test your MCP server using Claude, refer to the <a href="https://modelcontextprotocol.io/docs/develop/build-server#testing-your-server-with-claude-for-desktop-3">MCP docs</a>. Since I use <a href="https://sdkman.io/">sdkman</a>, the <code class="language-plaintext highlighter-rouge">command</code> value needed to be <code class="language-plaintext highlighter-rouge">~/.sdkman/candidates/java/current/bin/java</code>.</li>
</ul>

<h3 id="publishing-to-the-mcp-registry">Publishing to the MCP registry</h3>

<p>Publishing to the <a href="https://registry.modelcontextprotocol.io/">Official MCP registry</a> introduced a few additional challenges:</p>

<ul>
  <li><strong>Docker multi-platform builds</strong>: <a href="https://semantic-release.gitbook.io/semantic-release/extending/plugins-list#community-plugins">semenatic-release docker plugins </a> only support <code class="language-plaintext highlighter-rouge">amd64</code>. Since I was on an ARM-based Mac I needed <code class="language-plaintext highlighter-rouge">arm64</code> support and because I was already using <a href="https://github.com/GoogleContainerTools/jib">jib</a> to containerize my application, I opted to use <a href="https://github.com/semantic-release/exec">@semantic-release/exec</a> and jib directly to publish to Docker Hub.</li>
  <li><strong>Validating server.json</strong>: The <a href="https://modelcontextprotocol.io/registry/quickstart#step-3-install-mcp-publisher">mcp-publisher CLI</a> includes a <code class="language-plaintext highlighter-rouge">validate</code> command - use it early to verify your MCP server definition (<code class="language-plaintext highlighter-rouge">server.json</code>). I added this step to CI after encountering issues with description length during publishing.</li>
</ul>

<h2 id="closing-thoughts">Closing thoughts</h2>

<p>This project was a great way to explore agentic development in practice — moving beyond simple prompts to structured, tool-driven systems. As well as getting familiar with the Model Context Protocol and Spring AI.</p>

<p>And if nothing else, at least your AI will finally be able to complain about the weather too.</p>]]></content><author><name>Jonathan Harrison</name></author><category term="spring-ai" /><category term="mcp" /><category term="cursor" /><category term="java" /><summary type="html"><![CDATA[A practical look at building a weather MCP server with Spring AI and using Cursor to support the development workflow.]]></summary></entry><entry><title type="html">Integration tests in Angular using PollyJS</title><link href="jonjam.github.io/blog/2022/10/05/integration-tests-in-angular-using-pollyjs.html" rel="alternate" type="text/html" title="Integration tests in Angular using PollyJS" /><published>2022-10-05T00:00:00+00:00</published><updated>2022-10-05T00:00:00+00:00</updated><id>jonjam.github.io/blog/2022/10/05/integration-tests-in-angular-using-pollyjs</id><content type="html" xml:base="jonjam.github.io/blog/2022/10/05/integration-tests-in-angular-using-pollyjs.html"><![CDATA[<figure><img alt="Angular logo" src="/blog/assets/images/integration-tests-in-angular-using-pollyjs-nbJ41jD1-r2Oe6FsLjKaOg.png"/></figure>
<p>TLDR: The code is available at <a href="https://github.com/JonJam/angular_pollyjs_playground">https://github.com/JonJam/angular_pollyjs_playground</a></p>
<h3>Backstory</h3>
<p>During 2022, my squad has been trying to improve developer productivity by speeding up the build times (average 30 minutes) of a monolith we work in. We have had some great success by splitting out the frontend, which is a large Angular app into its own git repository.</p>
<p>The Angular app build takes around 25 minutes and the main culprit is the end to end testing setup; this takes on average 12 minutes to run, 47% of the total build time.</p>
<p>Other squads who use React have an integration test framework that utilizes <a href="https://netflix.github.io/pollyjs/#/README">PollyJ</a>S that was introduced to:</p>
<blockquote><em>“help convert a lot of E2E tests to speedier and deterministic integration tests”.</em></blockquote>
<p>For those reasons, I set out to do the same for Angular but when looking online I didn’t come across much guidance. That’s what motivated me to write this post to share how I achieved this, with the hope that it will help others.</p>
<h3>Aim</h3>
<p>As mentioned in the Backstory section, the aim was to build an integration test framework in Angular that would:</p>
<ol><li>Use the same packages as for unit tests: <a href="https://github.com/just-jeb/angular-builders/tree/master/packages/jest">jest</a> with <a href="https://ngneat.github.io/spectator/">ngneat/spectator</a>.</li><li>Automatically record any network requests/responses and be able to replay them for CI/CD.</li><li>Allow tests to be written using a <a href="https://en.wikipedia.org/wiki/Black-box_testing">black-box</a> style in the same fashion as end to end tests.</li></ol>
<h3>Packages</h3>
<h4>Angular Builders — Jest Builder</h4>
<p><a href="https://github.com/just-jeb/angular-builders/tree/master/packages/jest">Angular Builders — Jest Builder</a> allows running ng test (i.e unit tests) with Jest instead of Karma &amp; Jasmine (which is the default in Angular).</p>
<p>Related to Aim 1, this was re-used to create a new <a href="https://angular.io/guide/workspace-config#configuring-builder-targets">build target</a> for integration tests.</p>
<h4>ngneat/spectator</h4>
<p><a href="https://ngneat.github.io/spectator/">ngneat/spectator</a> is used to make unit tests simpler to write and allow querying the DOM akin to <a href="https://testing-library.com/">Testing library</a>.</p>
<p>ngneat/spectator has a special factory, createRoutingFactory, that can be used to test routing (and even mentions <a href="https://ngneat.github.io/spectator/docs/testing-with-routing#integration-testing-with-routertestingmodule">integration tests</a>).</p>
<p>Related to Aim 1 and 3, this is used to create and query/interact with the Angular app under test.</p>
<h4>PollyJS</h4>
<p><a href="https://netflix.github.io/pollyjs/#/README">PollyJ</a>S is JavaScript library created by Netflix and as stated on their documentation:</p>
<blockquote>Polly.JS is a standalone, framework-agnostic JavaScript library that enables recording, replaying, and stubbing of HTTP interactions.</blockquote>
<p>This package allows us to achieve Aim 2.</p>
<h3>Integration test framework</h3>
<p>Utilizing the <a href="https://angular.io/tutorial/toh-pt6">Angular Tutorial — Tour of Heroes</a> as an app to test and combining the packages mentioned in the previous section, resulted in this integration test framework that we will walkthrough.</p>
<p>The complete example can be found on GitHub: <a href="https://github.com/JonJam/angular_pollyjs_playground">JonJam/angular_pollyjs_playground</a>.</p>
<h4>Integration tests directory</h4>
<p>A new directory integration-tests exists outside of the src folder which contains the tests, as well as much of the configuration below needed to support them.</p>
<h4>Typescript configuration for Integration tests</h4>
<p><a href="https://github.com/JonJam/angular_pollyjs_playground/blob/main/tsconfig.integration.json">tsconfig.integration.json</a> extends the unit test configuration to include the code within the integration-tests directory.</p>
<pre>{
  "extends": "./tsconfig.spec.json",
  "include": [
    "integration-tests/**/*.ts",
  ],
  "compilerOptions": {
    "types": [
      "integration-tests/index.d.ts"
    ]
  }
}</pre>
<h4>Angular integration tests build target</h4>
<p>A new build target test-integration has been added to <a href="https://github.com/JonJam/angular_pollyjs_playground/blob/main/angular.json#L90">angular.json</a> that uses Jest Builder with integration test specific config files.</p>
<pre>"test-integration": {
  "builder": "@angular-builders/jest:run",
  "options": {
    "configPath": "integration-tests/jest-integration.config.js",
    "tsConfig": "tsconfig.integration.json"
  }
}</pre>
<h4>Integration tests npm scripts</h4>
<p>There are two new npm scripts in <a href="https://github.com/JonJam/angular_pollyjs_playground/blob/main/package.json">package.json</a> which run the integration tests.</p>
<pre>"test:integration": "ng run angular.io-example:test-integration",
"test:integration:record": "POLLY_MODE=record ng run angular.io-example:test-integration"</pre>
<p>test:integration:record will run the integration tests in record mode meaning the tests will make actual network requests and then upon completion, saves the recordings as .har files.</p>
<p>test:integration will run the integration tests in replay mode meaning the recordings will be used instead of making actual requests. This is what you would use in a CI/CD pipeline.</p>
<h4>Jest custom environment</h4>
<p>To setup PollyJS with jest we need to use a custom environment <a href="https://github.com/JonJam/angular_pollyjs_playground/blob/main/integration-tests/jest-integration.environment.js">jest-integration.environment.js</a>, per this <a href="https://netflix.github.io/pollyjs/#/test-frameworks/jest-jasmine">guidance</a>.</p>
<pre>// custom-environment
const SetupPollyJestEnvironment = require('setup-polly-jest/jest-environment-jsdom');

class JestIntegrationEnvironment extends SetupPollyJestEnvironment {
  constructor(config, context) {
    super(config, context);

    // Setting up testPath global for pollyContext.ts
    // Followed https://stackoverflow.com/questions/62995762/how-do-you-find-the-filename-and-path-of-a-running-test-in-jest
    this.global.testPath = context.testPath;
  }
}

module.exports = JestIntegrationEnvironment;</pre>
<p>This extends that provided by <a href="https://github.com/gribnoysup/setup-polly-jest">gribnoysup/setup-polly-jest</a> to setup a testPath global that is used in the PollyJS configuration.</p>
<h4>PollyJS setup</h4>
<p>PollyJS is configured within <a href="https://github.com/JonJam/angular_pollyjs_playground/blob/main/integration-tests/jest/setupFilesAfterEnv/pollyContext.ts">pollyContext.ts</a> which is referenced in the jest configuration.</p>
<pre>import { setupPolly } from 'setup-polly-jest';
import path from 'path';
import {PollyConfig} from '@pollyjs/core';
import {MODES} from '@pollyjs/utils';

function getPollyMode() : "record" | "replay" {
  let mode: PollyConfig['mode'] = MODES.REPLAY;

  switch (process.env['POLLY_MODE']) {
    case 'record':
      mode = MODES.RECORD;
      break;
    case 'replay':
      mode = MODES.REPLAY;
      break;
    case 'offline':
      mode = MODES.REPLAY;
      break;
  }

  return mode;
}

function getDefaultRecordingDir() {
  // This is setup using a custom jest environment
  const testPath: string = (global as any).testPath;

  return path.relative(
    process.cwd(),
    `${path.dirname(testPath)}/__recordings__`,
  );
}

const pollyContext = setupPolly({
    recordIfMissing: false,
    mode: getPollyMode(),
    // Having to use require imports due to https://github.com/gribnoysup/setup-polly-jest/issues/23
    adapters: [require('@pollyjs/adapter-xhr')],
    persister: require('@pollyjs/persister-fs'),
    persisterOptions: {
      fs: {
        recordingsDir: getDefaultRecordingDir(),
      },
      // Improve diff readability for git. See https://netflix.github.io/pollyjs/#/configuration?id=disablesortingharentries
      disableSortingHarEntries: true,
    },
    flushRequestsOnStop: true,
    recordFailedRequests: true,
    // Default level is warn. Useful to see PollyJs Recorded or Replayed logs
    logLevel: 'info',
    expiryStrategy: 'error',
    expiresIn: '14d',
    // Insulate the tests from differences in session data.
    //
    // See https://netflix.github.io/pollyjs/#/configuration?id=matchrequestsby for options.
    matchRequestsBy: {
      headers: false,
      body: false,
    },
  });

beforeEach(() =&gt; {
  // Grouping common requests so that they share a single recording.
  //
  // See https://netflix.github.io/pollyjs/#/server/route-handler?id=recordingname
  //
  // TODO Add common requests.
  // pollyContext.polly.server.any('/api/example').recordingName('Example');
});

global.pollyContext = pollyContext;</pre>
<p>This was put together using the <a href="https://github.com/Netflix/pollyjs/blob/master/examples/typescript-jest-node-fetch/src/utils/auto-setup-polly.ts">Typescript example</a> in PollyJS and <a href="https://github.com/spotify/polly-jest-presets/blob/master/src/pollyContext.ts">spotify/polly-jest-preset</a>.</p>
<p>I encourage you to read the <a href="https://netflix.github.io/pollyjs/#/configuration">PollyJS configuration documentation</a> to understand all the options, but to summarise what this is doing:</p>
<ul><li>It allows switching between record and replay modes based on an environment variable.</li><li>It persists recordings of network requests and responses to a __recordings__folder with the __tests__ directory (akin to jest snapshots).</li><li>It expires recordings every 14 days and causes the build to error when they do so.</li><li>It defines the request matching criteria to ignore headers and body contents.</li><li>It groups specified common requests to share a single recording.</li><li>It creates a global pollyContext that can be referenced in tests.</li></ul>
<h4>Jest configuration</h4>
<p><a href="https://github.com/JonJam/angular_pollyjs_playground/blob/main/integration-tests/jest-integration.config.js">jest-integration.config.js</a> configures the jest environment for the integration tests, referencing some of the previously mentioned files.</p>
<pre>// This is merged with default config as per https://github.com/just-jeb/angular-builders/tree/master/packages/jest#builder-options

// Test environment copied from: https://netflix.github.io/pollyjs/#/test-frameworks/jest-jasmine?id=supported-test-runners
module.exports = {
  testEnvironment: "&lt;rootDir&gt;/integration-tests/jest-integration.environment.js",
  testMatch: ["&lt;rootDir&gt;/integration-tests/__tests__/**/*.spec.ts"],
  setupFilesAfterEnv: [
    "&lt;rootDir&gt;/integration-tests/jest/setupFilesAfterEnv/pollyContext.ts",
  ]
};</pre>
<h4>utils/testUtils.ts</h4>
<p><a href="https://github.com/JonJam/angular_pollyjs_playground/blob/main/integration-tests/utils/testUtils.ts">testUtil.ts</a> contains helper functions such as starting the app and navigating to the initial page that are reused across integration tests.</p>
<pre>import {createRoutingFactory, SpectatorRouting} from '@ngneat/spectator/jest';
import {TestBed} from '@angular/core/testing';
import {NgZone} from '@angular/core';

import {AppComponent} from '../../src/app/app.component';
import {AppModule} from '../../src/app/app.module';

const createComponent = createRoutingFactory({
  component: AppComponent,
  imports: [AppModule],
  // Setting to false as per https://ngneat.github.io/spectator/docs/testing-with-routing#integration-testing-with-routertestingmodule
  // to perform an integration test.
  stubsEnabled: false,
  detectChanges: false
});

function startApp() : SpectatorRouting&lt;AppComponent&gt; {
  // Create app
  return createComponent();
}

async function navigateToInitialPage(spectator: SpectatorRouting&lt;AppComponent&gt;, url: string) : Promise&lt;void&gt; {
  // Navigate to page under test
  const ngZone = TestBed.inject(NgZone);
  await ngZone.run(async () =&gt; {
    await spectator.router.navigateByUrl(url);
  });

  // Wait for any HTTP and UI updates
  await global.pollyContext.polly.flush();
  spectator.detectChanges();
}

export { startApp, navigateToInitialPage };</pre>
<h3>Putting it all together</h3>
<p>Let’s put this into practice with an example test: <a href="https://github.com/JonJam/angular_pollyjs_playground/blob/main/integration-tests/__tests__/heroes.spec.ts">heroes.spec.ts</a>.</p>
<pre>import {byRole} from '@ngneat/spectator/jest';

import {navigateToInitialPage, startApp} from '../utils/testUtils';

describe('Heroes', () =&gt; {
  it('renders a list of heroes', async () =&gt; {
    // Start app and navigate to heroes page
    const spectator = startApp();
    const url = `heroes`;
    await navigateToInitialPage(spectator, url);

    // Update view with heroes data
    await global.pollyContext.polly.flush();
    spectator.detectChanges();

    // ASSERT
    const heroes : HTMLLIElement[] = spectator.queryAll(byRole('listitem'));

    const linkContents = heroes.map(li =&gt; {
      const link = li.querySelector('a');

      if (link === null || link.textContent === null) {
        return "";
      }

      return link.textContent.trim();

    });

    const expected =  [
      '1 Leanne Graham',
      '2 Ervin Howell',
      '3 Clementine Bauch',
      '4 Patricia Lebsack',
      '5 Chelsey Dietrich',
      '6 Mrs. Dennis Schulist',
      '7 Kurtis Weissnat',
      '8 Nicholas Runolfsdottir V',
      '9 Glenna Reichert',
      '10 Clementina DuBuque'
    ];

    expect(linkContents).toEqual(expect.arrayContaining(expected));
  });
});</pre>
<p>This test:</p>
<ul><li>Starts the app.</li><li>Navigates to /heroes .</li><li>Awaits for networks requests and the UI to update.</li><li>Asserts that the expected list is shown.</li></ul>
<p>First, we run this test using test:integration:record to create recordings.</p>
<pre>➜  angular_pollyjs_playground git:(main) yarn test:integration:record
yarn run v1.22.15
$ POLLY_MODE=record ng run angular.io-example:test-integration
Warning: 'no-cache' option has been declared with a 'no' prefix in the schema.Please file an issue with the author of this package.
Warning: 'noStackTrace' option has been declared with a 'no' prefix in the schema.Please file an issue with the author of this package.
Determining test suites to run...
ngcc-jest-processor: running ngcc
Request: GET https://jsonplaceholder.typicode.com/users
Response: Recorded ➞ GET https://jsonplaceholder.typicode.com/users 200 • 447ms
 PASS  integration-tests/__tests__/heroes.spec.ts (8.964 s)
  Heroes
    ✓ renders a list of heroes (502 ms)

Test Suites: 1 passed, 1 total
Tests:       1 passed, 1 total
Snapshots:   0 total
Time:        15.446 s
Ran all test suites.
✨  Done in 32.81s.</pre>
<p>The PollyJS logs helpfully show what requests and responses are being recorded. Now that we have some recordings, we can run test:integration to run in replay mode:</p>
<pre>➜  angular_pollyjs_playground git:(main) ✗ yarn test:integration
yarn run v1.22.15
$ ng run angular.io-example:test-integration
Warning: 'no-cache' option has been declared with a 'no' prefix in the schema.Please file an issue with the author of this package.
Warning: 'noStackTrace' option has been declared with a 'no' prefix in the schema.Please file an issue with the author of this package.
Determining test suites to run...
ngcc-jest-processor: running ngcc
Request: GET https://jsonplaceholder.typicode.com/users
Response: Replayed ➞ GET https://jsonplaceholder.typicode.com/users 200 • 2ms
 PASS  integration-tests/__tests__/heroes.spec.ts
  Heroes
    ✓ renders a list of heroes (53 ms)

Test Suites: 1 passed, 1 total
Tests:       1 passed, 1 total
Snapshots:   0 total
Time:        2.087 s, estimated 9 s
Ran all test suites.
✨  Done in 4.55s.</pre>
<p>That’s all folks :)</p>
<h3>Gotchas</h3>
<p>When doing this for real, there was a few things I came across that might be useful to know.</p>
<h4>Servers with self signed certificates</h4>
<p>If your tests run against a backend that uses self signed certificates, you may gets tests failing with errors like Error: self signed certificate .</p>
<p>To resolve this, I discovered this <a href="https://github.com/facebook/jest/issues/8449#issuecomment-781661413">jest issue</a> and did the following:</p>
<ul><li>CopiedJSDOMEnvironment from jest (make sure to copy the right version) into the app.</li><li>Modified the JSDOM construction in the class constructor to specify strictSSL:false when creating a ResourceLoader.</li><li>Changed the jest-integration.environment.js to use this custom JSDOMEnvironment.</li></ul>
<h4>ngneat/spectator and ActivatedRoute</h4>
<p>Normally to get the active route in Angular, we use <a href="https://angular.io/api/router/ActivatedRoute">ActivatedRoute</a>; but when using ngneat/spectator’s createRoutingFactory (even with stubsEnabled: false) the value is a stub ActivatedRouteStub; you can see the code <a href="https://github.com/ngneat/spectator/blob/master/projects/spectator/src/lib/spectator-routing/create-factory.ts#L68">here</a>.</p>
<p>This caused issues for the app under test as certain functionality isn’t implemented (accessing snapshotand firstchild properties).</p>
<p>A workaround is to use router.routerstate.root instead of ActivatedRoute , since this is what Angular uses internally (see <a href="https://github.com/angular/angular/blob/14.2.3/packages/router/src/router_module.ts#L50">router_module</a> and <a href="https://github.com/angular/angular/blob/14.2.3/packages/router/src/provide_router.ts">provide_router</a>).</p>
<h4>Base URL for relative requests</h4>
<p>The app under test used relative requests i.e. /api/example as it expects to run on the same domain as the API.</p>
<p>When running as an integration test, I found that requests were being made tohttps://github.com/just-jeb/angular-builders/api/example.</p>
<p>To resolve this, I had to set the base url in jest-integration.config.js by adding:</p>
<pre>testEnvironmentOptions: {
  url: "https://localhost",
},</pre>]]></content><author><name>Jonathan Harrison</name></author><category term="front-end-development" /><category term="web-development" /><category term="testing" /><category term="angular" /><category term="integration-testing" /><summary type="html"><![CDATA[Our Angular build spent nearly half its time on end to end tests, so I built a faster integration test framework using Jest, Spectator and PollyJS to record and replay network requests.]]></summary></entry><entry><title type="html">My DigitalOcean App Platform Hackathon entry: stock-checker - Part 1: Background and learning golang</title><link href="jonjam.github.io/blog/2020/12/26/my-golang-journey-part-1-background-and-learning-golang.html" rel="alternate" type="text/html" title="My DigitalOcean App Platform Hackathon entry: stock-checker - Part 1: Background and learning golang" /><published>2020-12-26T00:00:00+00:00</published><updated>2020-12-26T00:00:00+00:00</updated><id>jonjam.github.io/blog/2020/12/26/my-golang-journey-part-1-background-and-learning-golang</id><content type="html" xml:base="jonjam.github.io/blog/2020/12/26/my-golang-journey-part-1-background-and-learning-golang.html"><![CDATA[<p><img src="/blog/assets/images/2020-12-26-my-golang-journey-part-1-background-and-learning-golang-23ni-sajjbu8rnbfpx92ejj6i.png" alt="Part 1: Background and learning golang" /></p>

<blockquote>
  <p>The cover image is from <a href="https://github.com/MariaLetta/free-gophers-pack">MariaLetta/free-gophers-pack</a></p>
</blockquote>

<p>This post is part of a series detailing my journey with <a href="https://golang.org/"><code class="language-plaintext highlighter-rouge">golang</code></a> from learning the language to entering the <a href="https://dev.to/devteam/announcing-the-digitalocean-app-platform-hackathon-on-dev-2i1k">DigitalOcean App Platform Hackathon</a>.</p>

<p>The app I built can be found on <a href="https://github.com/JonJam/stock-checker">GitHub</a>.</p>

<p>Part 1 details:</p>

<ul>
  <li>How I came up with the project idea</li>
  <li>How I learnt golang</li>
</ul>

<h1 id="background">Background</h1>

<p>In August 2020, I wanted to start a new side project and learn something new.</p>

<p>At the top of my backlog was <a href="https://golang.org/"><code class="language-plaintext highlighter-rouge">golang</code></a>.</p>

<p>In the following months, I completed online courses and read blogs, guides, language specification etc to get familiar with the language.</p>

<p>At the beginning of December, I thought it was about time I built something.</p>

<p>At the same time, my youngest brother who had missed getting a <a href="https://www.xbox.com/en-GB/consoles/xbox-series-x">Xbox Series X</a> on the UK launch day decided that he wanted one. What transpired was every time a UK retailer potentially had a re-stock, my two brothers and I would be checking their website throughout the day to try buy one; only to fail every time.</p>

<p>Then I saw this <a href="https://dev.to/marisayou/how-to-get-a-playstation-5-when-it-s-always-out-of-stock-5d4i">DEV post</a>. This inspired me to build an app in <code class="language-plaintext highlighter-rouge">golang</code> that would check various UK retailers for a Xbox Series X and notify my brothers and I when available.</p>

<p>Lastly I saw that <a href="https://www.digitalocean.com/">DigitalOcean</a> were hosting a <a href="https://dev.to/devteam/announcing-the-digitalocean-app-platform-hackathon-on-dev-2i1k">Hackathon</a>. This provided an opportunity to also get experience working with a cloud platform I hadn’t used before and more importantly, gave me a deadline to work to.</p>

<blockquote>
  <p>This series details the journey of building the stock-checker app:</p>
</blockquote>

<ul>
  <li>Part 1 - Learning <code class="language-plaintext highlighter-rouge">golang</code> (this one)</li>
  <li>Part 2 - Development environment</li>
  <li>Part 3 - Developing the stock-checker app</li>
  <li>Part 4 - Deploying to DigitalOcean</li>
</ul>

<h1 id="learning-golang">Learning golang</h1>

<p>How I tend to learn something new is by trying to expose myself to as much information as possible from a variety of sources, even if I can’t remember it all.</p>

<p>This is so that when I start building something I do it the right way and also, it gives me mental “hints” to further lookup things during development.</p>

<p>With that, here are the resources I used to learn <code class="language-plaintext highlighter-rouge">golang</code>.</p>

<h2 id="online-courses">Online courses</h2>

<ul>
  <li><a href="https://www.udemy.com/share/1013gw/">Learn How To Code: Google’s Go (golang) Programming Language</a></li>
  <li><a href="https://www.udemy.com/share/102aeq/">Master Go (Golang) Programming:The Complete Go Bootcamp 2021</a></li>
  <li><a href="https://www.udemy.com/share/101YFa/">Go Bootcamp: Master Golang with 1000+ Exercises and Projects </a></li>
  <li><a href="https://www.udemy.com/share/101XnU/">Go: The Complete Developer’s Guide (Golang)</a></li>
  <li><a href="https://www.udemy.com/share/101Xnq/">Web Development w/ Google’s Go (golang) Programming Language</a></li>
</ul>

<h2 id="documentation">Documentation</h2>

<h3 id="golangorg">golang.org</h3>

<p>Particular areas of <a href="https://golang.org/">golang.org</a>:</p>

<ul>
  <li><a href="https://tour.golang.org/welcome/1">A Tour of Go</a></li>
  <li><a href="https://golang.org/doc/code.html">How to write Go Code</a></li>
  <li><a href="https://golang.org/ref/spec">Language Specification</a></li>
  <li><a href="https://golang.org/doc/effective_go.html">Effective Go</a></li>
</ul>

<h3 id="go-blog">Go Blog</h3>

<p>The <a href="https://blog.golang.org/">Go Blog</a> has many posts going into depth about aspects of the language.</p>

<h3 id="golanggo-github">golang/go GitHub</h3>

<p>The <a href="https://github.com/golang/go">GitHub Wiki</a> contains many resources for every aspect of programming with <code class="language-plaintext highlighter-rouge">golang</code> from learning, tools and libraries.</p>

<h3 id="godev">go.dev</h3>

<p><a href="https://go.dev/">go.dev</a> details the different use cases of <code class="language-plaintext highlighter-rouge">golang</code> such as cloud and network services as well as companies using it for that purpose and libraries/frameworks to consider.</p>

<h1 id="next">Next</h1>

<p>That’s it for this post.</p>

<p>In part 2, I will talk about my development environment.</p>]]></content><author><name>Jonathan Harrison</name></author><category term="golang" /><category term="learning" /><category term="digitalocean" /><category term="hackathon" /><summary type="html"><![CDATA[How I came up with the stock-checker project idea and the resources I used to learn Go before building it.]]></summary></entry><entry><title type="html">My DigitalOcean App Platform Hackathon entry: stock-checker - Part 2: Development environment</title><link href="jonjam.github.io/blog/2020/12/26/my-golang-journey-part-2-development-environment.html" rel="alternate" type="text/html" title="My DigitalOcean App Platform Hackathon entry: stock-checker - Part 2: Development environment" /><published>2020-12-26T00:00:00+00:00</published><updated>2020-12-26T00:00:00+00:00</updated><id>jonjam.github.io/blog/2020/12/26/my-golang-journey-part-2-development-environment</id><content type="html" xml:base="jonjam.github.io/blog/2020/12/26/my-golang-journey-part-2-development-environment.html"><![CDATA[<p><img src="/blog/assets/images/2020-12-26-my-golang-journey-part-2-development-environment-2edg-ic5s5vy52czom5643e5w.png" alt="Part 2: Development environment" /></p>

<blockquote>
  <p>The cover image is from <a href="https://github.com/MariaLetta/free-gophers-pack">MariaLetta/free-gophers-pack</a></p>
</blockquote>

<p>This post is part of a series detailing my journey with <a href="https://golang.org/"><code class="language-plaintext highlighter-rouge">golang</code></a> from learning the language to entering the <a href="https://dev.to/devteam/announcing-the-digitalocean-app-platform-hackathon-on-dev-2i1k">DigitalOcean App Platform Hackathon</a>.</p>

<p>The app I built can be found on <a href="https://github.com/JonJam/stock-checker">GitHub</a>.</p>

<p>Part 2 details the setup of my <code class="language-plaintext highlighter-rouge">golang</code> development environment.</p>

<h1 id="setup-golang">Setup <code class="language-plaintext highlighter-rouge">golang</code></h1>

<h2 id="install-golang">Install <code class="language-plaintext highlighter-rouge">golang</code></h2>

<p>First step is to install <code class="language-plaintext highlighter-rouge">golang</code> which can be done by following this <a href="https://golang.org/doc/install">page</a>.</p>

<h2 id="create-workspace">Create workspace</h2>

<blockquote>
  <p>This step is not required when using <a href="https://blog.golang.org/using-go-modules">modules</a>. See the note on this <a href="https://golang.org/doc/code.html">page</a>.</p>
</blockquote>

<p>Create a <a href="https://golang.org/doc/gopath_code.html#Workspaces">workspace</a> which results in the directory structure shown below.</p>

<div class="language-plaintext highlighter-rouge"><div class="highlight"><pre class="highlight"><code>$HOME
    └── go
        ├── bin
        └── src
</code></pre></div></div>

<h2 id="set-environment-variables">Set environment variables</h2>

<p>Next I added the following environment variables to my <code class="language-plaintext highlighter-rouge">.zshrc</code> file.</p>

<div class="language-plaintext highlighter-rouge"><div class="highlight"><pre class="highlight"><code>export GOPATH=/Users/jonjam/go
export GOBIN=/Users/jonjam/go/bin
export PATH=$GOPATH/bin:$GOROOT/bin:$PATH
</code></pre></div></div>

<p>More information about these variables can be found <a href="https://golang.org/doc/install/source#environment">here</a>.</p>

<h1 id="setup-visual-studio-code">Setup Visual Studio Code</h1>

<p>There are plenty of <a href="https://github.com/golang/go/wiki/IDEsAndTextEditorPlugins">choices</a> when it comes to IDEs. I went with <a href="https://code.visualstudio.com/">Visual Studio Code</a>, since I was already familiar with it.</p>

<p>This section details configuring it for <code class="language-plaintext highlighter-rouge">golang</code>.</p>

<h2 id="install-and-activate-go-extension">Install and activate Go extension</h2>

<p>First to add <code class="language-plaintext highlighter-rouge">golang</code> support to VS Code, install the <a href="https://marketplace.visualstudio.com/items?itemName=golang.Go">Go extension</a>.</p>

<p>After installing the extension, there are some additional command line tools that also need to be installed to support the extension. This can be done by following this <a href="https://github.com/golang/vscode-go#activate-the-go-extension">page</a>.</p>

<h2 id="configure-formatting-tool">Configure formatting tool</h2>

<p>The default formatting tool in VS Code is <a href="https://github.com/sqs/goreturns"><code class="language-plaintext highlighter-rouge">goreturns</code></a> which doesn’t work with modules (see <a href="https://github.com/golang/vscode-go/blob/master/docs/modules.md">here</a> for more information).</p>

<p><a href="https://pkg.go.dev/golang.org/x/tools/cmd/goimports"><code class="language-plaintext highlighter-rouge">goimports</code></a> on the other hand does support modules.</p>

<p>Change the <code class="language-plaintext highlighter-rouge">go.formatTool</code> setting to <code class="language-plaintext highlighter-rouge">goimports</code>.</p>

<h2 id="enable-the-go-language-server">Enable the Go language server</h2>

<p>Besides formatting, some of the other helper tools do not support modules (see <a href="https://github.com/golang/vscode-go/blob/master/docs/modules.md">here</a> for more information).</p>

<p>The <a href="https://github.com/golang/tools/tree/master/gopls">Go language server</a> should be used; this can be enabled by following these <a href="https://github.com/golang/vscode-go/blob/master/docs/gopls.md#enable-the-language-server">steps</a>.</p>

<h2 id="setup-debugging">Setup debugging</h2>

<p>Debugging <code class="language-plaintext highlighter-rouge">golang</code> apps in VS Code is provided by <a href="https://github.com/go-delve/delve">Delve</a>.</p>

<p>Follow these <a href="https://github.com/golang/vscode-go/blob/master/docs/debugging.md">steps</a> to install and configure Delve.</p>

<h1 id="setup-linter">Setup linter</h1>

<p>Now that VS Code is setup, the final step is to choose a linter to assist with development.</p>

<p>I chose <a href="https://github.com/golangci/golangci-lint"><code class="language-plaintext highlighter-rouge">golangci-lint</code></a>. It is a fast go linters runner that is capable of running multiple linters in parralel.</p>

<p>I discovered this on <a href="https://github.com/golang/go/wiki/CodeTools">golang wiki</a>.</p>

<h2 id="install">Install</h2>

<p><code class="language-plaintext highlighter-rouge">golangci-lint</code> can be installed locally by following these <a href="https://golangci-lint.run/usage/install/#local-installation">steps</a>.</p>

<h2 id="configure-linting-tool">Configure linting tool</h2>

<p>To integrate <code class="language-plaintext highlighter-rouge">golangci-lint</code> with VS Code, it is just a matter of changing a couple of <a href="https://golangci-lint.run/usage/integrations/">settings</a>.</p>

<h2 id="create-configuration-file">Create configuration file</h2>

<p>The final step is to create a <code class="language-plaintext highlighter-rouge">.golangci.yml</code> for the project which defines what linters are enabled. This can also be used to enable/disable specific rules.</p>

<p>Below is the <code class="language-plaintext highlighter-rouge">.golangci.yml</code> file from stock-checker app:</p>

<div class="language-plaintext highlighter-rouge"><div class="highlight"><pre class="highlight"><code>linters:
  disable-all: true
  enable:
    # Default enabled linters
    - deadcode
    - errcheck
    - gosimple
    - govet
    - ineffassign
    - staticcheck
    - structcheck
    - typecheck
    - varcheck

    # Added
    # goimports aligns with VS Code setup and includes gofmt
    - goimports
    - golint
</code></pre></div></div>

<h1 id="next">Next</h1>

<p>That’s it for this post.</p>

<p>In part 3, I will talk about developing the project.</p>]]></content><author><name>Jonathan Harrison</name></author><category term="golang" /><category term="development-environment" /><category term="visual-studio-code" /><category term="golangci-lint" /><summary type="html"><![CDATA[How I set up a Go development environment with Visual Studio Code, debugging, formatting, language support and golangci-lint.]]></summary></entry><entry><title type="html">My DigitalOcean App Platform Hackathon entry: stock-checker - Part 3: Developing stock-checker app</title><link href="jonjam.github.io/blog/2020/12/26/part-3-developing-stock-checker-app.html" rel="alternate" type="text/html" title="My DigitalOcean App Platform Hackathon entry: stock-checker - Part 3: Developing stock-checker app" /><published>2020-12-26T00:00:00+00:00</published><updated>2020-12-26T00:00:00+00:00</updated><id>jonjam.github.io/blog/2020/12/26/part-3-developing-stock-checker-app</id><content type="html" xml:base="jonjam.github.io/blog/2020/12/26/part-3-developing-stock-checker-app.html"><![CDATA[<p><img src="/blog/assets/images/2020-12-26-part-3-developing-stock-checker-app-4bnc-5ih9vfz7aw1afriviq0w.png" alt="Part 3: Developing stock-checker app" /></p>

<p>This post is part of a series detailing my journey with <a href="https://golang.org/"><code class="language-plaintext highlighter-rouge">golang</code></a> from learning the language to entering the <a href="https://dev.to/devteam/announcing-the-digitalocean-app-platform-hackathon-on-dev-2i1k">DigitalOcean App Platform Hackathon</a>.</p>

<p>The app I built can be found on <a href="https://github.com/JonJam/stock-checker">GitHub</a>.</p>

<p>Part 3 details:</p>

<ul>
  <li><code class="language-plaintext highlighter-rouge">golang</code> packages used to build stock-checker</li>
  <li><code class="language-plaintext highlighter-rouge">docker</code> setup for both development and production</li>
  <li>Integrating with Twilio SMS API</li>
</ul>

<h1 id="overview">Overview</h1>

<p>stock-checker is a <code class="language-plaintext highlighter-rouge">golang</code> app that spawns a task every hour to check whether any of the following UK retailers have an Xbox Series X console in stock:</p>

<ul>
  <li><a href="http://argos.co.uk/">Argos</a></li>
  <li><a href="https://www.amazon.co.uk/">Amazon</a></li>
  <li><a href="https://www.currys.co.uk">Currys</a></li>
  <li><a href="https://game.co.uk">Game</a></li>
  <li><a href="https://www.johnlewis.com/">John Lewis</a></li>
  <li><a href="https://www.shopto.net/">Shopto</a></li>
  <li><a href="https://www.smythstoys.com">Smyths</a></li>
</ul>

<p>This is done using a web automation library that navigates each site in a headless chromium browser.</p>

<p>If the app determines stock is available, a text message is sent using <a href="https://www.twilio.com">Twilio</a> to the configured mobile number.</p>

<h1 id="golang-packages">golang packages</h1>

<p>A number of different packages were used to build this app which are detailed in this section.</p>

<p>These packages were discovered on <a href="https://awesome-go.com">Awesome Go</a>.</p>

<h2 id="web-automation---go-rodrod">Web Automation - go-rod/rod</h2>

<p><a href="https://github.com/go-rod/rod"><code class="language-plaintext highlighter-rouge">rod</code></a> is a high-level driver for the <a href="https://chromedevtools.github.io/devtools-protocol/">DevTools Protocol</a>.</p>

<p>This package is used to navigate the various retailer’s sites to find the Xbox Series X console listing. Once found, it checks whether the console is in or out of stock.</p>

<p>Notable features include:</p>

<ul>
  <li><a href="https://go-rod.github.io/#/emulation?id=bypass-bot-detection">Bypass bot detection</a></li>
  <li><a href="https://go-rod.github.io/#/custom-launch">Custom browser launch</a></li>
  <li><a href="https://go-rod.github.io/#/page-pool">Concurrent execution using PagePool</a></li>
</ul>

<h2 id="configuration---spf13viper">Configuration - spf13/viper</h2>

<p><a href="https://github.com/spf13/viper"><code class="language-plaintext highlighter-rouge">Viper</code></a> is a configuration package that supports reading configuration files in various formats, as well as from environment variables.</p>

<p>This is being used to control:</p>

<ul>
  <li>The scheduler interval</li>
  <li>Debug settings for <code class="language-plaintext highlighter-rouge">rod</code></li>
  <li>Enables/disables sending notifications and the secrets used to communicate with Twilio.</li>
</ul>

<p>I used an <code class="language-plaintext highlighter-rouge">envfile</code> to define the app’s configuration. Originally, I tried using a <code class="language-plaintext highlighter-rouge">YAML</code> file but due to a couple of issues, I had to swap the file format.</p>

<p>To help others, here are the issues I ran into when using <code class="language-plaintext highlighter-rouge">YAML</code>:</p>

<ul>
  <li><a href="https://github.com/spf13/viper/issues/1029">GitHub Issue</a>: If you want to override a <code class="language-plaintext highlighter-rouge">YAML</code> subobject property with an environment variable, you have to name the variable using the following format: <code class="language-plaintext highlighter-rouge">PREFIX_SECURE.KEY</code>. <a href="https://www.digitalocean.com/docs/app-platform/how-to/use-environment-variables/">DigitalOcean App Platform environment variables</a> do not support <code class="language-plaintext highlighter-rouge">.</code> in the name.</li>
  <li><a href="https://github.com/spf13/viper/issues/1012">GitHub Issue</a>: If you want to override a <code class="language-plaintext highlighter-rouge">YAML</code> subobject property with an environment variable and unmarshal that object to a struct, this isn’t currently possible. This is because <code class="language-plaintext highlighter-rouge">viper.UnmarshalKey</code> doesn’t take account of environment variables.</li>
</ul>

<h2 id="scheduler---go-co-opgocron">Scheduler - go-co-op/gocron</h2>

<p><a href="https://github.com/go-co-op/gocron"><code class="language-plaintext highlighter-rouge">goCron</code></a> is a scheduling package that lets you run functions periodically at a pre-determined interval.</p>

<p>This is being used to run a task once an hour that checks the various retailers and if applicable, sends a notification.</p>

<h1 id="docker-support">docker support</h1>

<p>To simplify running the app on <a href="https://www.digitalocean.com/">DigitalOcean</a>, I added <a href="https://www.docker.com/"><code class="language-plaintext highlighter-rouge">docker</code></a> support which this section covers.</p>

<h2 id="dockerfile">Dockerfile</h2>

<p>This amazing <a href="https://blog.jetbrains.com/go/2020/05/04/go-development-with-docker-containers/">JetBrains blog post series</a> greatly inspired the <code class="language-plaintext highlighter-rouge">Dockerfile</code> created for this project.</p>

<p>Using <a href="https://docs.docker.com/develop/develop-images/multistage-build/">multi-stage builds</a> it provides both a development image with debugging support and a production image.</p>

<div class="language-plaintext highlighter-rouge"><div class="highlight"><pre class="highlight"><code># Builder
FROM golang:1.15.6-buster AS builder
COPY . /src
WORKDIR /src
RUN go get github.com/go-delve/delve/cmd/dlv
RUN go build -gcflags="all=-N -l" -o app-dev
RUN go build -o app

# Base runner
FROM debian:10.7 AS base-runner
RUN apt-get update &amp;&amp; apt-get install -y \
    ca-certificates \
    chromium \
    &amp;&amp; rm -rf /var/lib/apt/lists/*

# Dev runner
FROM base-runner AS dev-runner
WORKDIR /server
COPY config.env /server
COPY --from=builder /src/app-dev /server/app
COPY --from=builder /go/bin/dlv /server
EXPOSE 40000
CMD ["/server/dlv", "--listen=:40000", "--headless=true", "--api-version=2", "--accept-multiclient", "exec", "/server/app"]

# Prod runner
FROM base-runner AS prod-runner
WORKDIR /server
COPY config.env /server
COPY --from=builder /src/app /server
CMD ["./app"]
</code></pre></div></div>

<h2 id="docker-compose">docker-compose</h2>

<p>To assist with development, this <code class="language-plaintext highlighter-rouge">docker-compose</code> file starts a development container with debugging enabled and enables a few <code class="language-plaintext highlighter-rouge">rod</code> debug options via environment variables.</p>

<div class="language-plaintext highlighter-rouge"><div class="highlight"><pre class="highlight"><code>version: "3.9"

services:
  app:
    build:
      context: ./..
      target: dev-runner
    security_opt:
      - seccomp:unconfined
    cap_add:
      - SYS_PTRACE
    container_name: stock-checker-$USER

    ports:
      - "40000:40000" # DEBUG

    environment:
      - SC_ROD_TRACE=true
      - SC_ROD_PAGEPOOLSIZE=1
</code></pre></div></div>

<h2 id="remote-debugging-using-vs-code">Remote debugging using VS Code</h2>

<p>To remote debug the app within <code class="language-plaintext highlighter-rouge">docker</code>, we need to create a launch configuration by following this <a href="https://github.com/golang/vscode-go/blob/master/docs/debugging.md#remote-debugging">guide</a>.</p>

<p>The resulting config looks like this:</p>

<div class="language-plaintext highlighter-rouge"><div class="highlight"><pre class="highlight"><code>{
    "version": "0.2.0",
    "configurations": [
        {
            "name": "Launch and debug in Docker",
            "type": "go",
            "request": "attach",
            "mode": "remote",
            "cwd": "${workspaceFolder}",
            "port": 40000,
            "host": "127.0.0.1",
            // This corresponds to the directory the app is built in
            "remotePath": "/src"
        },
    ]
}
</code></pre></div></div>

<h1 id="integrating-with-twilio">Integrating with Twilio</h1>

<p><a href="https://www.twilio.com">Twilio</a> is being used to send a SMS when the app detects a Xbox Series X console is in stock.</p>

<p>Originally, I was going to use <a href="https://github.com/saintpete/twilio-go"><code class="language-plaintext highlighter-rouge">saintpete/twilio-go</code></a> which I discovered <a href="https://www.twilio.com/docs/libraries/community-supported-libraries">here</a>. However I ran into issues with this package due to incompatible package versions.</p>

<p>In the end, I went with a simpler approach and ended up following this <a href="https://www.twilio.com/blog/2017/09/send-text-messages-golang.html">blog post</a> to integrate with their SMS API directly.</p>

<h1 id="next">Next</h1>

<p>That’s it for this post.</p>

<p>In the final part, I will detail my <a href="https://dev.to/devteam/announcing-the-digitalocean-app-platform-hackathon-on-dev-2i1k">DigitalOcean App Platform Hackathon</a> submission as well as deploying to DigitalOcean.</p>]]></content><author><name>Jonathan Harrison</name></author><category term="golang" /><category term="docker" /><category term="web-automation" /><category term="twilio" /><summary type="html"><![CDATA[How I built the stock-checker app in Go, including the packages, Docker setup and Twilio SMS integration used to monitor Xbox Series X stock.]]></summary></entry><entry><title type="html">My DigitalOcean App Platform Hackathon entry: stock-checker - Part 4: DigitalOcean App Platform Hackathon Submission</title><link href="jonjam.github.io/blog/2020/12/26/part-4-digitalocean-app-platform-hackathon-submission-2.html" rel="alternate" type="text/html" title="My DigitalOcean App Platform Hackathon entry: stock-checker - Part 4: DigitalOcean App Platform Hackathon Submission" /><published>2020-12-26T00:00:00+00:00</published><updated>2020-12-26T00:00:00+00:00</updated><id>jonjam.github.io/blog/2020/12/26/part-4-digitalocean-app-platform-hackathon-submission-2</id><content type="html" xml:base="jonjam.github.io/blog/2020/12/26/part-4-digitalocean-app-platform-hackathon-submission-2.html"><![CDATA[<p><img src="/blog/assets/images/2020-12-26-part-4-digitalocean-app-platform-hackathon-submission-2-445-02tppn0au5sgjupvk0wp.png" alt="Part 4: DigitalOcean App Platform Hackathon Submission" /></p>

<p>This post is part of a series detailing my journey with <a href="https://golang.org/"><code class="language-plaintext highlighter-rouge">golang</code></a> from learning the language to entering the <a href="https://dev.to/devteam/announcing-the-digitalocean-app-platform-hackathon-on-dev-2i1k">DigitalOcean App Platform Hackathon</a>.</p>

<p>The app I built can be found on <a href="https://github.com/JonJam/stock-checker">GitHub</a>.</p>

<p>Part 4 details the DigitalOcean App Platform Hackathon submission and how it is deployed.</p>

<h2 id="what-i-built">What I built</h2>

<h3 id="category-submission">Category Submission</h3>

<p>Random Roulette</p>

<h3 id="app-link">App Link</h3>

<p>N/A</p>

<h3 id="screenshots">Screenshots</h3>

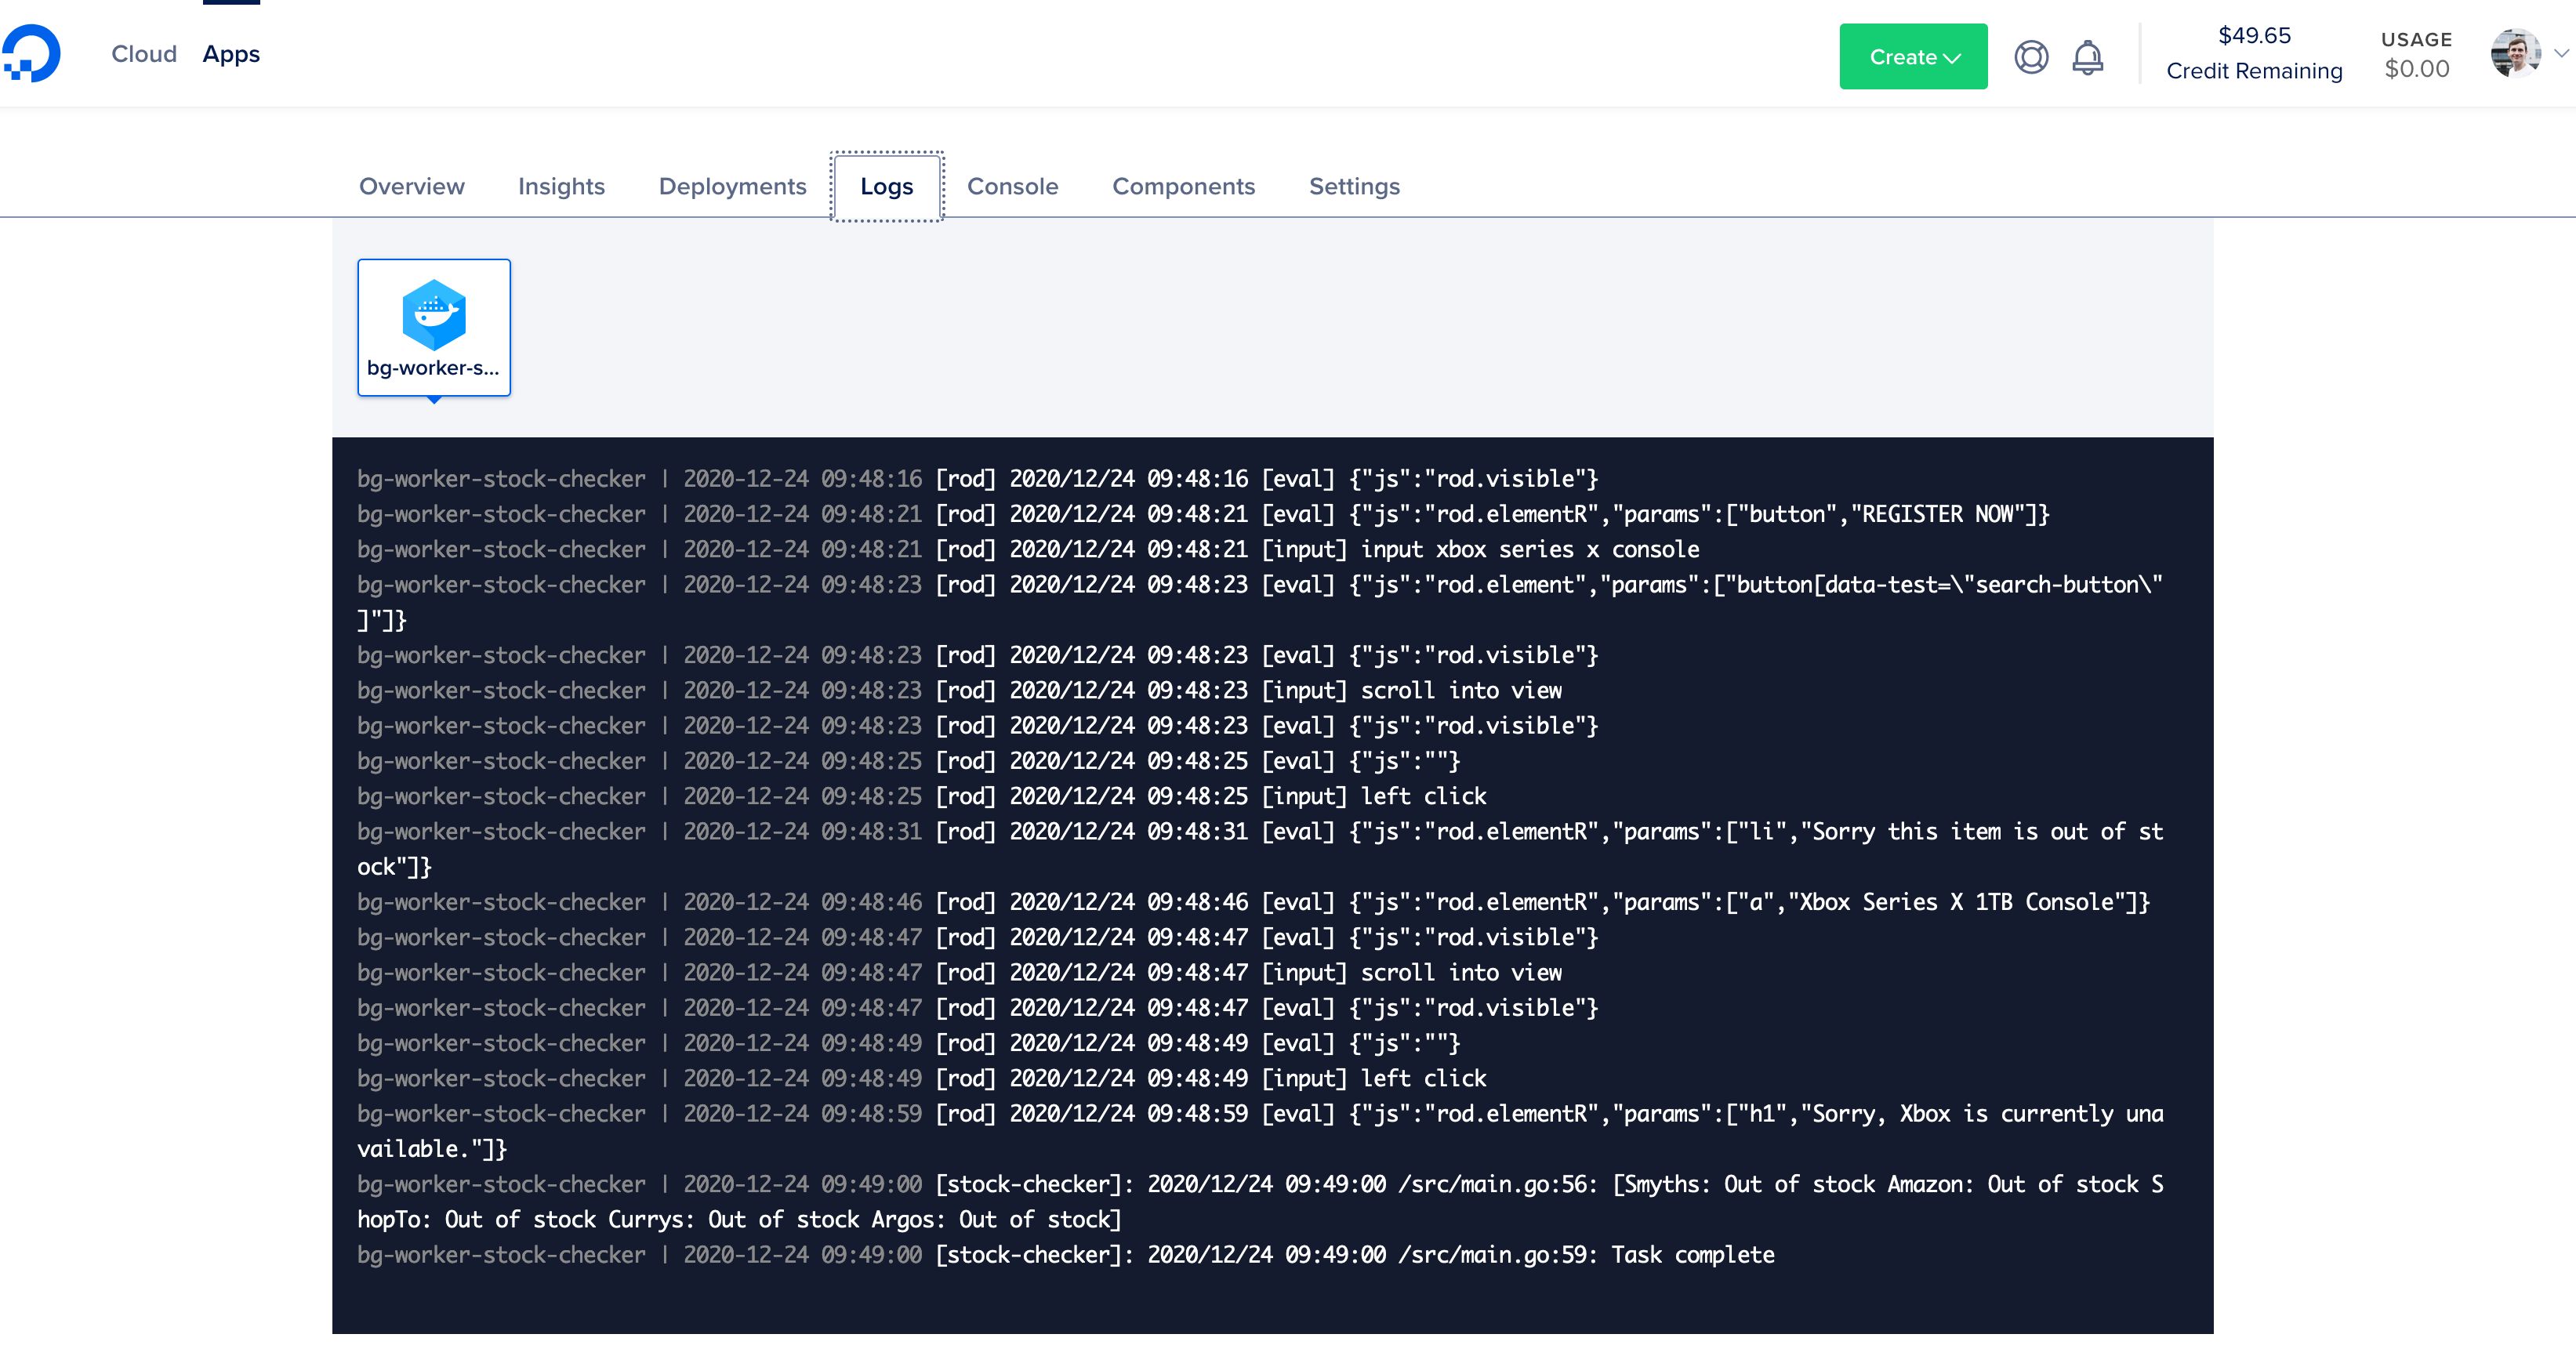
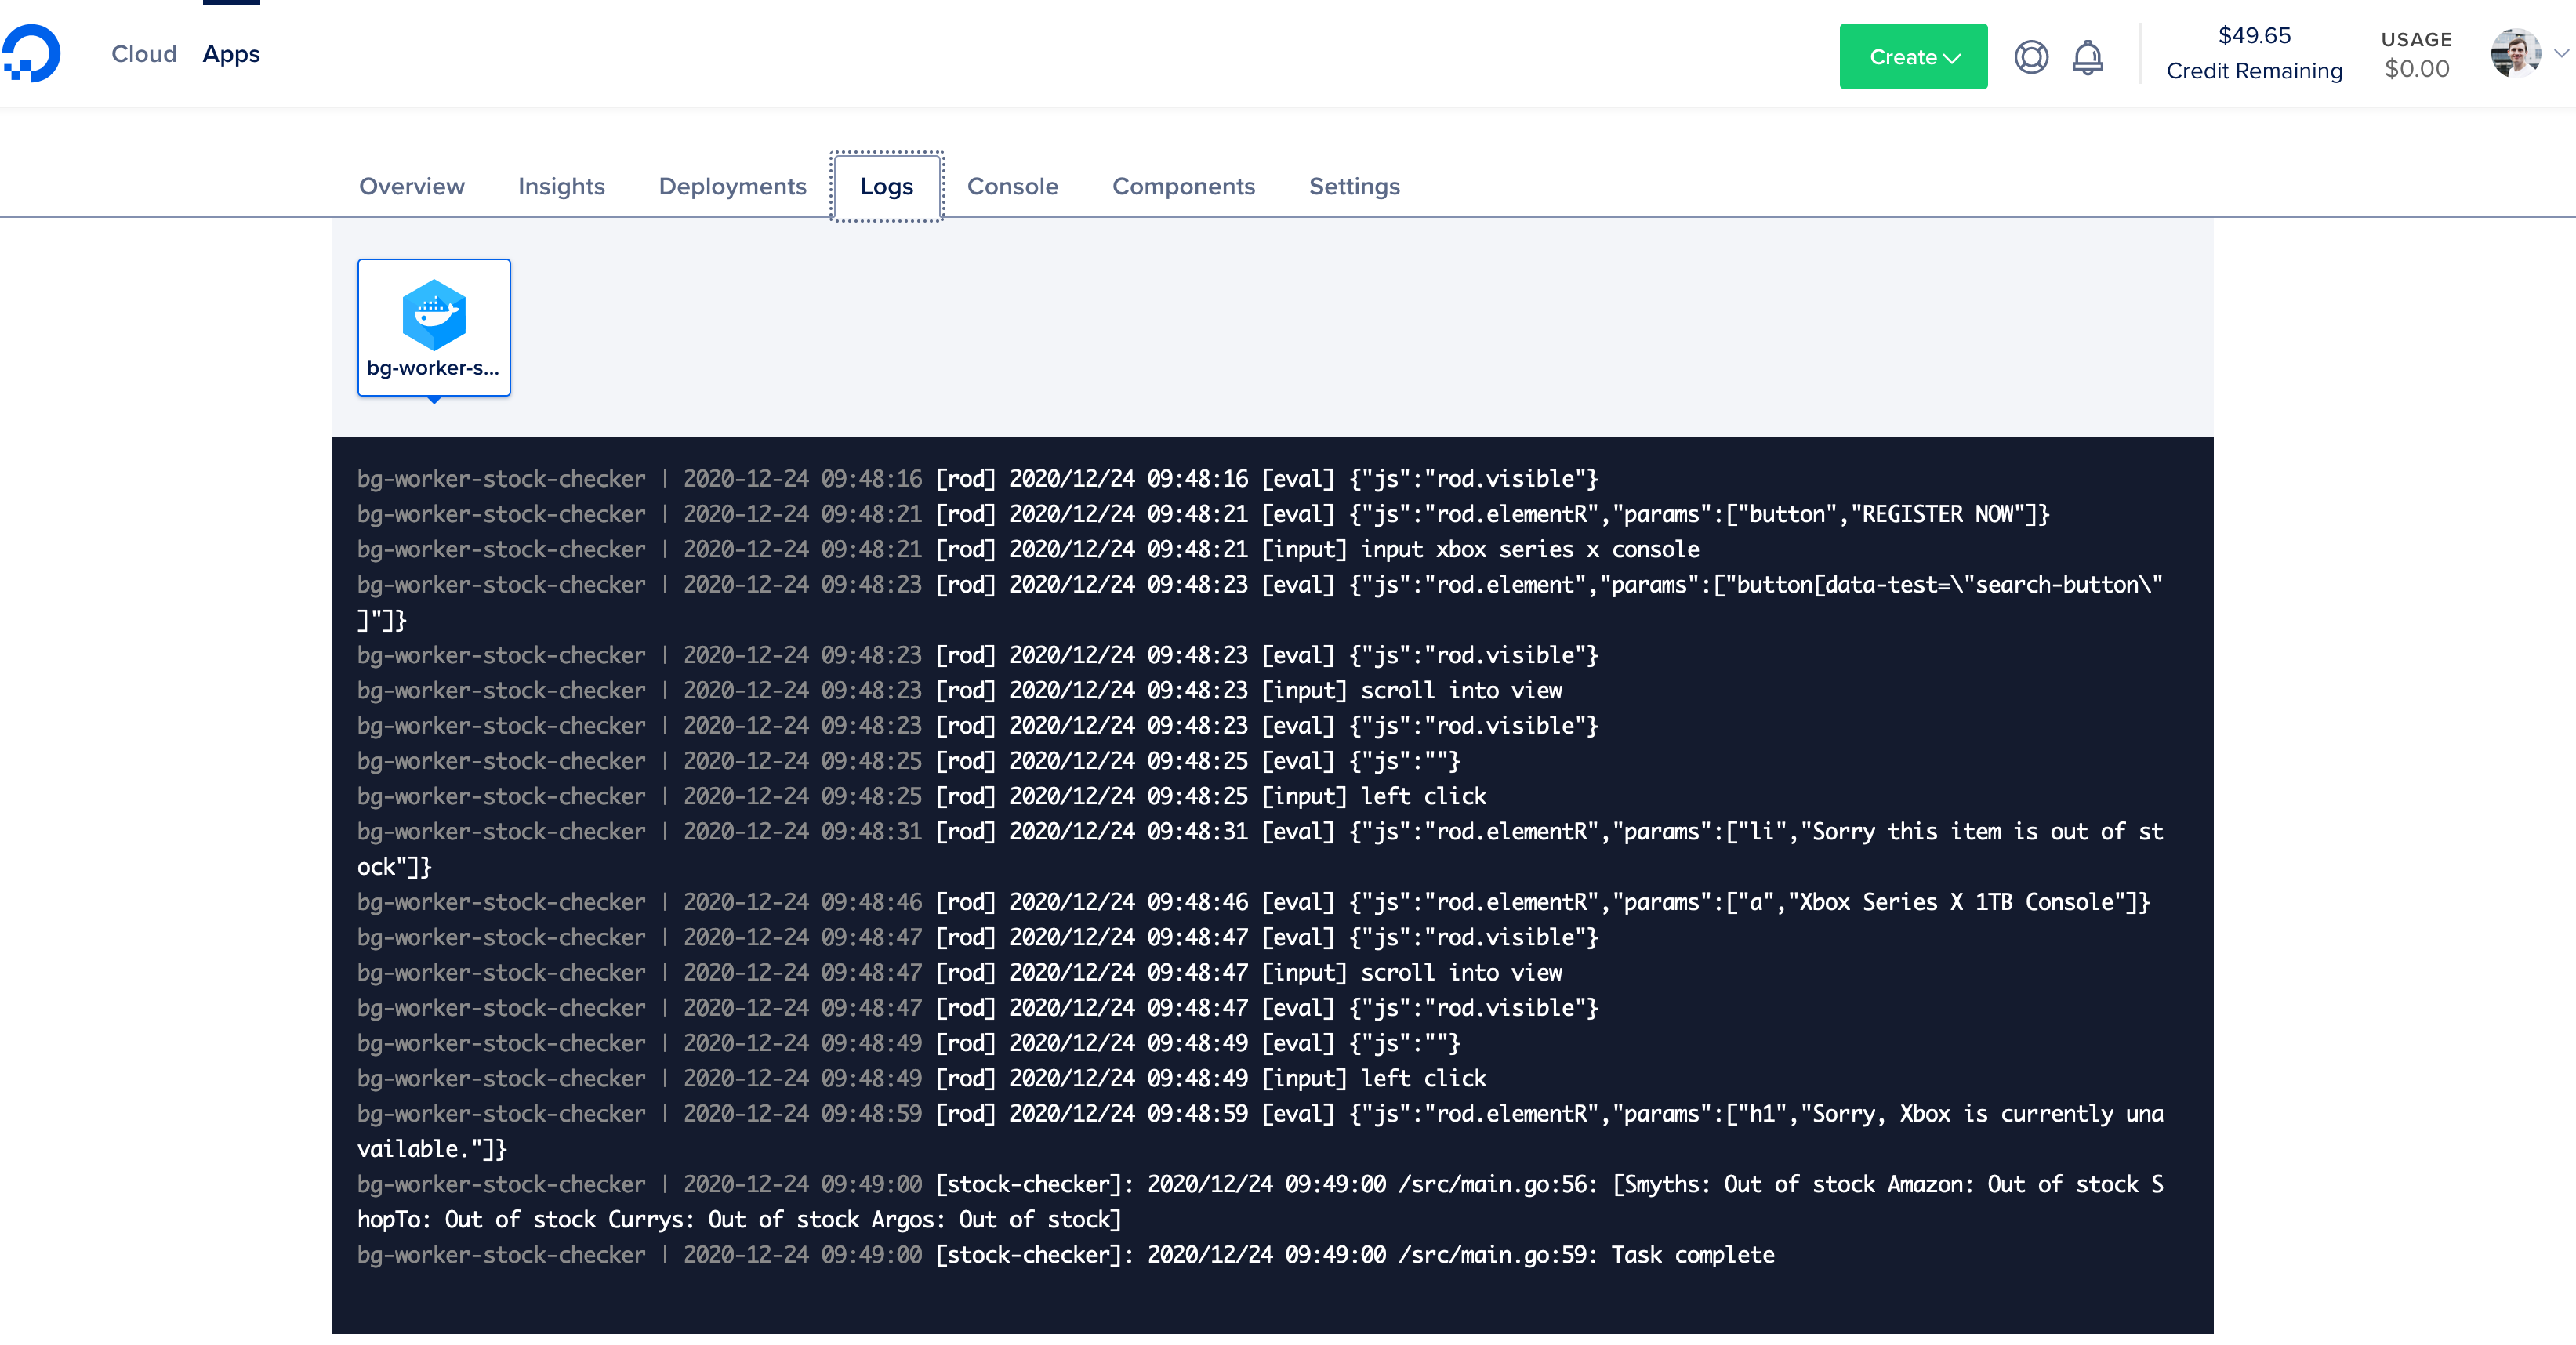
<p><img src="/blog/assets/images/2020-12-26-part-4-digitalocean-app-platform-hackathon-submission-2-445-zexeolf7l0hksklih0gm.png" alt="Alt Text" /></p>

<h3 id="description">Description</h3>

<p>stock-checker is a <code class="language-plaintext highlighter-rouge">golang</code> app that spawns a task every hour to check whether any of the following UK retailers have an Xbox Series X console in stock:</p>

<ul>
  <li><a href="http://argos.co.uk/">Argos</a></li>
  <li><a href="https://www.amazon.co.uk/">Amazon</a></li>
  <li><a href="https://www.currys.co.uk">Currys</a></li>
  <li><a href="https://game.co.uk">Game</a></li>
  <li><a href="https://www.johnlewis.com/">John Lewis</a></li>
  <li><a href="https://www.shopto.net/">Shopto</a></li>
  <li><a href="https://www.smythstoys.com">Smyths</a></li>
</ul>

<p>This is done using a web automation library that navigates each site in a headless chromium browser.</p>

<p>If the app determines stock is available, a text message is sent using <a href="https://www.twilio.com">Twilio</a> to the configured mobile number.</p>

<p>This is deployed to a <a href="https://www.digitalocean.com/docs/app-platform/how-to/manage-workers/">DigitalOcean App Platform Worker</a> using a <code class="language-plaintext highlighter-rouge">Dockerfile</code>.</p>

<h3 id="link-to-source-code">Link to Source Code</h3>

<p><a href="https://github.com/JonJam/stock-checker">GitHub</a></p>

<h3 id="permissive-license">Permissive License</h3>

<p><a href="https://github.com/JonJam/stock-checker/blob/main/LICENSE">MIT</a></p>

<h2 id="background">Background</h2>

<p>See <a href="https://dev.to/jonjam/my-golang-journey-part-1-background-and-learning-golang-23ni">Part 1</a> of this series.</p>

<h3 id="how-i-built-it">How I built it</h3>

<p>See <a href="https://dev.to/jonjam/part-3-developing-stock-checker-app-4bnc">Part 3</a> of this series.</p>

<h3 id="hosting-and-deployment">Hosting and deployment</h3>

<p>This <code class="language-plaintext highlighter-rouge">golang</code> app is deployed using <code class="language-plaintext highlighter-rouge">docker</code> to a <a href="https://www.digitalocean.com/docs/app-platform/how-to/manage-workers/">Worker component</a> on <a href="https://www.digitalocean.com/docs/app-platform/">DigitalOcean’s App Platform</a>.</p>

<p>The DO App is defined using an <a href="https://www.digitalocean.com/docs/app-platform/references/app-specification-reference/">Application Reference specification</a> which is shown below:</p>

<div class="language-plaintext highlighter-rouge"><div class="highlight"><pre class="highlight"><code>name: stock-checker-app
region: fra
workers:
- name: bg-worker-stock-checker
  github:
    branch: main
    deploy_on_push: true
    repo: JonJam/stock-checker
  dockerfile_path: Dockerfile
  instance_count: 1
  instance_size_slug: basic-xs
  envs:
  - key: SC_TWILIO_ENABLED
    scope: RUN_AND_BUILD_TIME
    value: "true"
  - key: SC_TWILIO_ACCOUNTSID
    scope: RUN_AND_BUILD_TIME
    type: SECRET
    value: ""
  - key: SC_TWILIO_AUTHTOKEN
    scope: RUN_AND_BUILD_TIME
    type: SECRET
    value: ""
  - key: SC_TWILIO_NUMBERTO
    scope: RUN_AND_BUILD_TIME
    type: SECRET
    value: ""
  - key: SC_TWILIO_NUMBERFROM
    scope: RUN_AND_BUILD_TIME
    type: SECRET
    value: ""
</code></pre></div></div>

<p>This App was then deployed using <a href="https://www.digitalocean.com/docs/apis-clis/doctl/">doctl</a>.</p>

<p>Originally I was going to use a <a href="https://www.digitalocean.com/docs/app-platform/how-to/add-deploy-do-button/">Deploy to DigitalOcean button</a>, however worker components are not currently supported.</p>

<p>Prior to this project, I wasn’t familiar with Digital Ocean so using the App Platform was new to me. The resources I found useful are listed below:</p>

<ul>
  <li><a href="https://www.digitalocean.com/docs/app-platform/how-to/manage-workers/">App Platform - Workers</a></li>
  <li><a href="https://www.digitalocean.com/docs/app-platform/how-to/use-environment-variables/">App Platform - Environment variables</a></li>
  <li><a href="https://www.digitalocean.com/docs/app-platform/references/app-specification-reference/">App Platform - App Specification Reference</a></li>
  <li><a href="https://www.digitalocean.com/community/tech_talks/defining-your-app-specification-on-digitalocean-app-platform">App Platform - Tech Talk</a></li>
  <li><a href="https://www.digitalocean.com/docs/apis-clis/doctl/">doctl - Reference</a></li>
</ul>

<h3 id="additional-resources--info">Additional Resources / Info</h3>

<p>-</p>]]></content><author><name>Jonathan Harrison</name></author><category term="golang" /><category term="digitalocean" /><category term="docker" /><category term="hackathon" /><summary type="html"><![CDATA[The final part of my Go stock-checker journey, covering the DigitalOcean App Platform Hackathon submission and deployment.]]></summary></entry><entry><title type="html">Building a Kubernetes dashboard using Xamarin Forms</title><link href="jonjam.github.io/blog/2018/09/24/building-a-kubernetes-dashboard-using-xamarin-forms.html" rel="alternate" type="text/html" title="Building a Kubernetes dashboard using Xamarin Forms" /><published>2018-09-24T00:00:00+00:00</published><updated>2018-09-24T00:00:00+00:00</updated><id>jonjam.github.io/blog/2018/09/24/building-a-kubernetes-dashboard-using-xamarin-forms</id><content type="html" xml:base="jonjam.github.io/blog/2018/09/24/building-a-kubernetes-dashboard-using-xamarin-forms.html"><![CDATA[<p>On and off over the past 6 months, I have been living in the world of <a href="https://docs.microsoft.com/en-us/xamarin/xamarin-forms/">Xamarin Forms</a> to build a cross platform mobile app; with the plan to move to learning native Android and iOS development afterwards.</p>
<p>For those who haven’t come across <a href="https://visualstudio.microsoft.com/xamarin/">Xamarin</a> before, it is a cross platform technology from Microsoft that allows you to build native Android and iOS applications using C# and .NET. Xamarin Forms provides a UI toolkit allowing you to define UI code for both platforms.</p>
<p>I really liked using Xamarin Forms for what I was building, but just found every now and again you had to deal with some pain like:</p>
<ul><li>Upgrading Android Support NuGet Packages.</li><li>Debugging exceptions that give no detail.</li><li>Working out why XAML fails to compile.</li></ul>
<p>But you have to forgive it, given what magic Xamarin is doing under the covers.</p>
<p>Anyway during that time I read pretty much all the documentation and came across useful resources that showed me the right direction to, so I thought I would share them.</p>
<h3>An aside … introducing kubemob</h3>
<p>Prior to diving into Xamarin Forms I was playing around with Kubernetes (which you can read more about <a href="https://itnext.io/building-a-kubernetes-deployment-pipeline-for-microsoft-bot-framework-part-1-ddbb9f6f1796">here</a>); this gave me the idea of building the equivalent of <a href="https://github.com/kubernetes/dashboard">Kubernetes Dashboard</a> as an Android and iOS app.</p>
<p>When developing this application, I tried to closely match the Kubernetes Dashboard experience:</p>
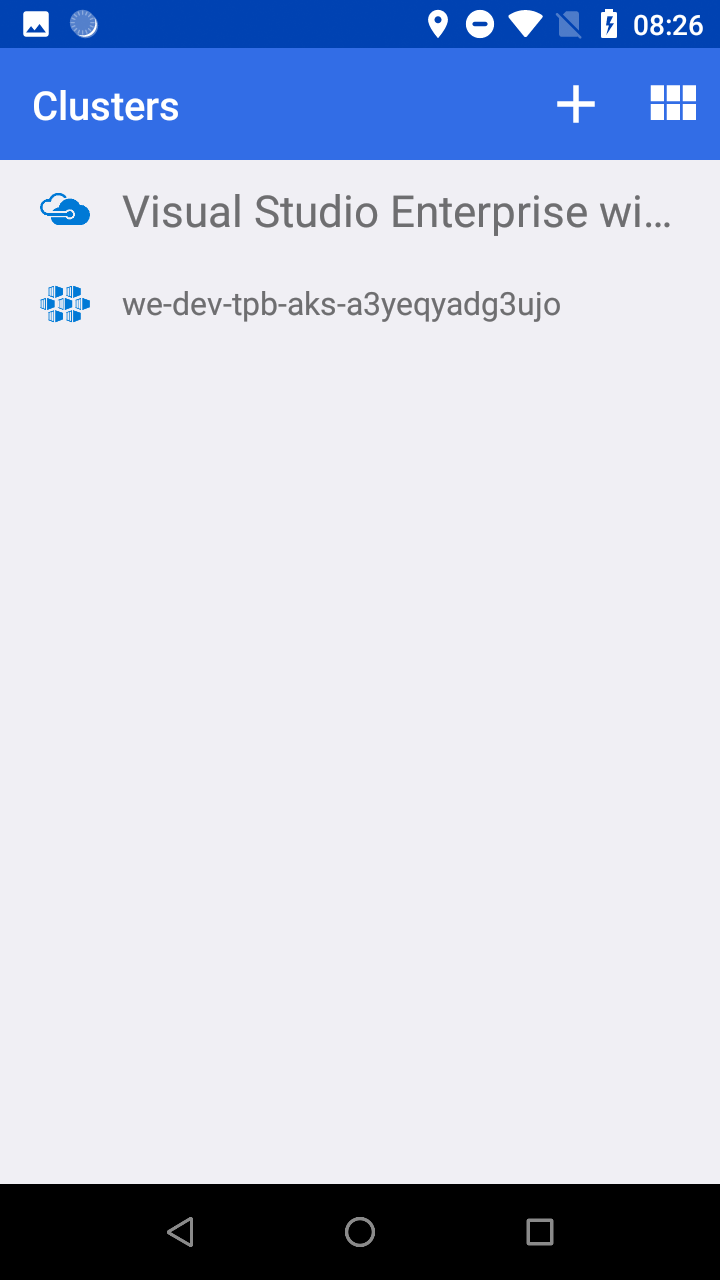
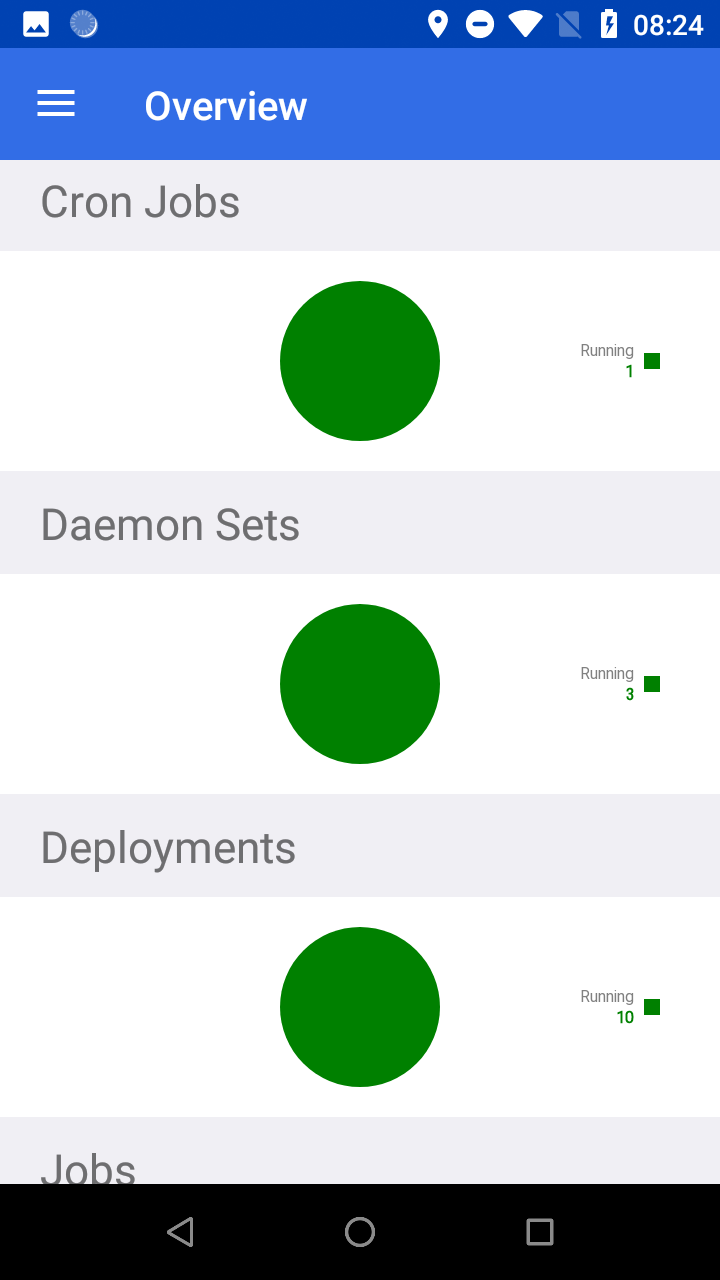
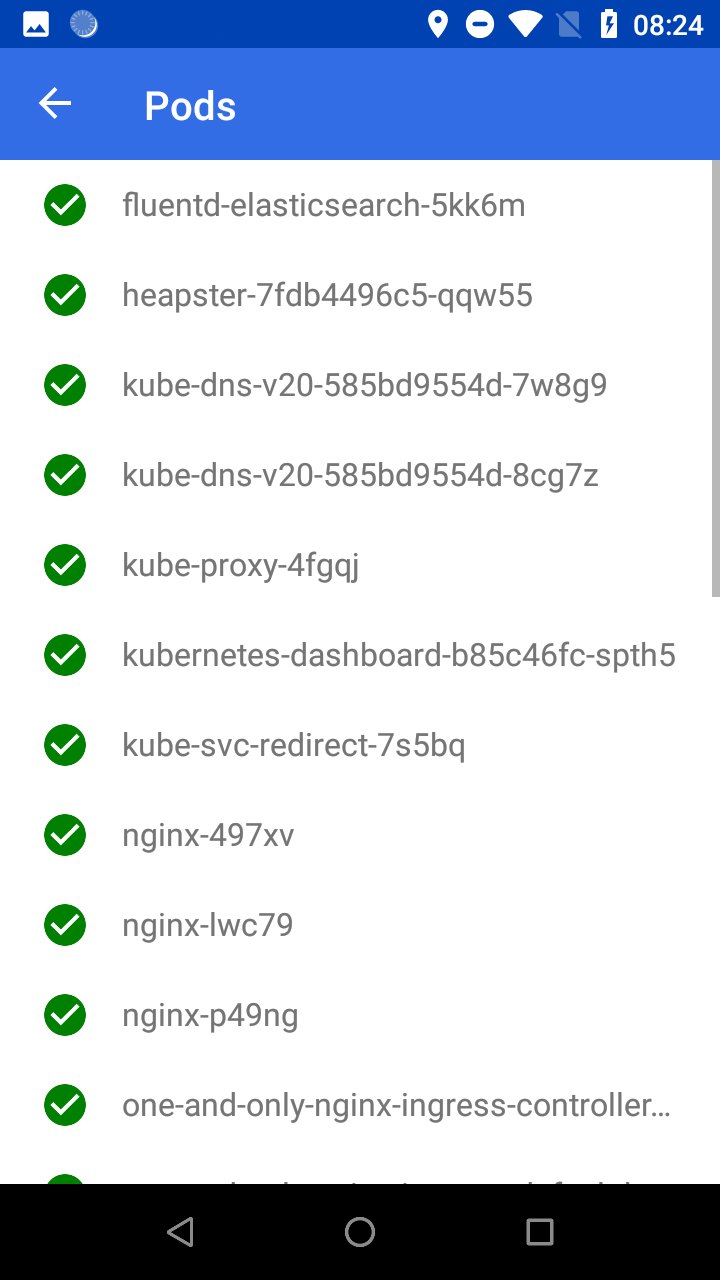
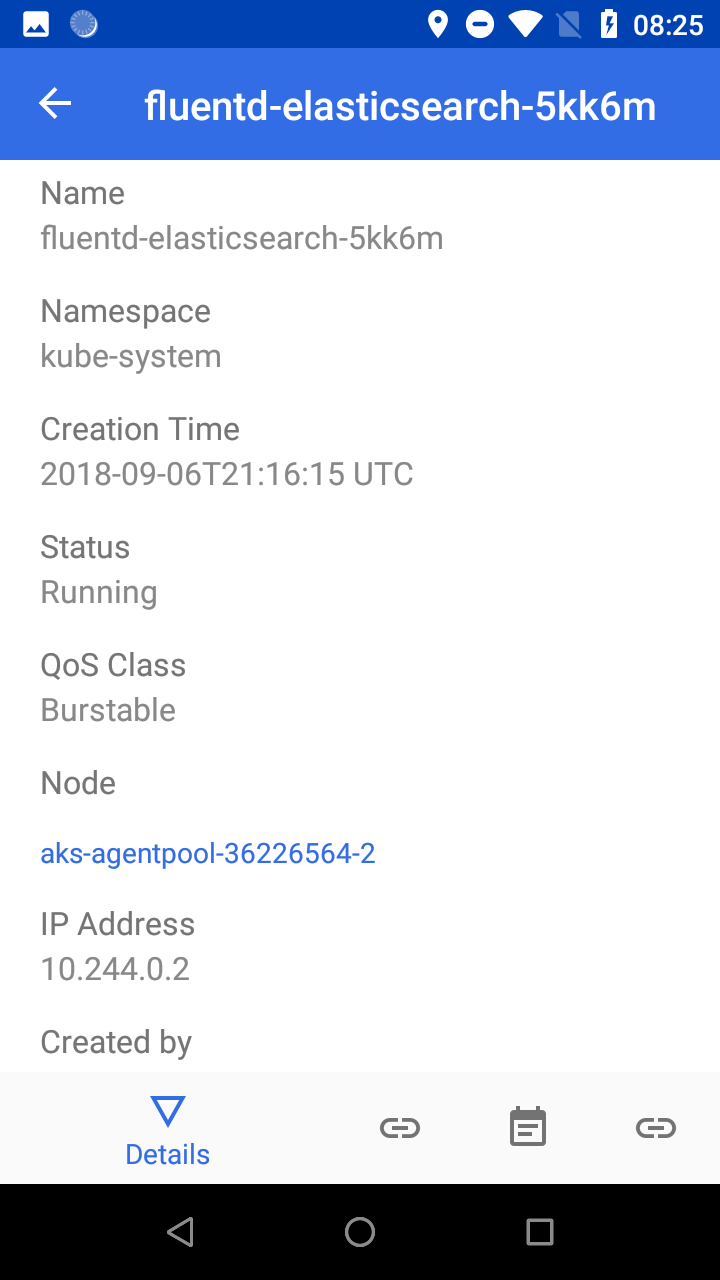
<figure><img alt="Clusters page" src="/blog/assets/images/building-a-kubernetes-dashboard-using-xamarin-forms-P2TVNgBV7NJAOYdX9yp6Q.png"/><figcaption>Clusters page</figcaption></figure>
<figure><img alt="Cluster Overview page" src="/blog/assets/images/building-a-kubernetes-dashboard-using-xamarin-forms-z1boC6rLwSJrtQnhtYHVMg.png"/><figcaption>Cluster Overview page</figcaption></figure>
<figure><img alt="Pods page" src="/blog/assets/images/building-a-kubernetes-dashboard-using-xamarin-forms-ndP7lqn-MH8sY9_gRD3XfQ.png"/><figcaption>Pods page</figcaption></figure>
<figure><img alt="Pod Detail page" src="/blog/assets/images/building-a-kubernetes-dashboard-using-xamarin-forms-TpugXxY_Yy8-EMF2WlfZKQ.png"/><figcaption>Pod Detail page</figcaption></figure>
<p>Currently the app just supports viewing Kubernetes resources, and only Kubernetes clusters within Microsoft Azure subscriptions. However in the future (when I get more time), I would like to add:</p>
<ul><li>Search</li><li>The ability to create, edit and delete resources.</li><li>Support for other clouds including AWS and Google Cloud Platform.</li></ul>
<h3>Architecture</h3>
<p>This section focuses on the architecture of the app including design patterns.</p>
<h4>Model View View Model (MVVM)</h4>
<p>Xamarin Forms is built around the MVVM pattern and is pretty much unavoidable.</p>
<p><a href="https://docs.microsoft.com/en-us/xamarin/xamarin-forms/enterprise-application-patterns/mvvm">The Model-View-ViewModel Pattern - Xamarin</a></p>
<p>Xamarin provide a great deal of useful code sample to facilitate using MVVM which includes:</p>
<ul><li><a href="https://github.com/JonJam/kubemob/blob/master/KubeMob/KubeMob.Common/ViewModels/Base/ExtendedBindableObject.cs">ExtendedBindableObject</a> — a class that extends Xamarin Form’s built in <a href="https://docs.microsoft.com/en-us/dotnet/api/system.componentmodel.inotifypropertychanged?view=netframework-4.7.2">INotifyPropertyChanged</a> implementation with syntactic sugar.</li><li><a href="https://github.com/JonJam/kubemob/blob/master/KubeMob/KubeMob.Common/ViewModelLocator.cs">ViewModelLocator</a> — this automatically creates the corresponding view model for a page and sets its binding context. It also provides the means for a view model to do any initialization work, before it’s page is displayed.</li><li><a href="https://github.com/JonJam/kubemob/blob/master/KubeMob/KubeMob.Common/Behaviors/EventToCommandBehavior.cs">EventToCommandBehavior</a> — this behavior allows you to bind <a href="https://docs.microsoft.com/en-us/dotnet/api/system.windows.input.icommand?view=netframework-4.7.2">ICommands</a> to view events, allowing you to be a “MVVM purest”.</li></ul>
<h4>Dependency injection</h4>
<p>Using a dependency injection (DI) container goes hand in hand with using a ViewModelLocator, and provides the same benefits as when used elsewhere such as facilitating testability.</p>
<p><a href="https://docs.microsoft.com/en-us/xamarin/xamarin-forms/enterprise-application-patterns/dependency-injection">Dependency Injection - Xamarin</a></p>
<p>I know there are many DI containers out there, but I chose to go with ASP NET Core’s default dependency injection framework. The reason is that Microsoft.Extensions.DependencyInjection is very easy to setup and is not bloated with hundreds of features that I won’t use like <a href="https://autofac.org/">Autofac</a>.</p>
<p><a href="https://www.nuget.org/packages/Microsoft.Extensions.DependencyInjection/">Microsoft.Extensions.DependencyInjection 5.0.1</a></p>
<h4>Navigation service</h4>
<p>Again in trying to be pure MVVM, view models shouldn't know about UI specifics. In the case of Xamarin Forms, navigation is done by manipulating a stack of page types.</p>
<p><a href="https://docs.microsoft.com/en-us/xamarin/xamarin-forms/enterprise-application-patterns/navigation">Enterprise App Navigation - Xamarin</a></p>
<p>To abstract navigation away, I created a <a href="https://github.com/JonJam/kubemob/blob/master/KubeMob/KubeMob.Common/Services/Navigation/NavigationService.cs">NavigationService</a> class but in contrast to the documentation I prefer to have explicit methods to navigate to pages; in contrast to using view model types to drive which page to go to.</p>
<h4>Configuration</h4>
<p>The <a href="https://github.com/JonJam/kubemob/blob/master/KubeMob/KubeMob.Common/Services/Settings/AppSettings.cs">AppSettings</a> class contains all the user settings used throughout kubemob; this follows the configuration management pattern discussed here:</p>
<p><a href="https://docs.microsoft.com/en-us/xamarin/xamarin-forms/enterprise-application-patterns/configuration-management">Configuration Management - Xamarin</a></p>
<h4>Validation</h4>
<p>When a user tries to add an Azure account, validation is performed to ensure that all entries are populated.</p>
<p>Any errors that occur need to be feedback to the user and the setup shown on the following link, is easily expandable for any validation rule you can think of.</p>
<p><a href="https://docs.microsoft.com/en-us/xamarin/xamarin-forms/enterprise-application-patterns/validation">Validation in Enterprise Apps - Xamarin</a></p>
<h4>Localization</h4>
<p>Although I’m not supporting multiple languages currently, I think it’s best to set it up from the beginning as in the long run, it will save a lot of time and work later on when you do have to support other languages.</p>
<p><a href="https://docs.microsoft.com/en-us/xamarin/xamarin-forms/app-fundamentals/localization/text?tabs=vswin#overview">String and Image Localization - Xamarin</a></p>
<h3>Performance</h3>
<p>This section focuses on techniques you can do to improve performance of an application and decrease the app size.</p>
<h4>Enable XAML compilation</h4>
<p><a href="https://docs.microsoft.com/en-us/xamarin/xamarin-forms/xaml/xamlc">XAML compilation</a> is a feature in Xamarin Forms that enables compile time checking of XAML and it also removes some of the load and instantiation time, as well as reduces the final app size.</p>
<p>You can enable it app-wide by adding the <a href="https://docs.microsoft.com/en-us/dotnet/api/xamarin.forms.xaml.xamlcompilationattribute?view=xamarin-forms">XamlCompilation </a>attribute to <a href="https://github.com/JonJam/kubemob/blob/master/KubeMob/KubeMob.Common/App.xaml.cs">App.xaml.cs</a></p>
<h4>Configure the linker (and other tips)</h4>
<p>There are a great number of tips to improve the performance of your Xamarin Android or iOS applications as discussed here.</p>
<p><a href="https://docs.microsoft.com/en-us/xamarin/cross-platform/deploy-test/memory-perf-best-practices">Cross-Platform Performance - Xamarin</a></p>
<p>One of the most notable is the Linker which can help reduce the size of the application by removing unused code.</p>
<p>One recommendation I have is to enable Link All from day one, even in Debug mode. The reason I recommend this is that it enables you to catch any errors during development, when the Linker actually removes code that is required.</p>
<p>If its your code you can use the <a href="https://docs.microsoft.com/en-us/xamarin/ios/deploy-test/linker?tabs=vsmac#preserving-code">PreserveAttribute</a> to ensure the code isn’t removed; whereas if its a NuGet package you can specify in the project settings for Linker to ignore certain assemblies(<a href="https://docs.microsoft.com/en-us/xamarin/ios/deploy-test/linker?tabs=vsmac#skipping-assemblies">Android</a> / <a href="https://docs.microsoft.com/en-us/xamarin/ios/deploy-test/linker?tabs=vsmac#skipping-assemblies">iOS</a>).</p>
<h4>List view performance</h4>
<p>kubemob uses quite a few list views to display data throughout the application and if you aren’t careful, they can appear sluggish.</p>
<p>There are number of different techniques discussed here to ensure any list views stay responsive.</p>
<p><a href="https://docs.microsoft.com/en-us/xamarin/xamarin-forms/user-interface/listview/performance">ListView Performance - Xamarin</a></p>
<h4>Use layout compression</h4>
<p>When you have complicated layouts, you can improve the page rendering performance by using layout compression.</p>
<p>This aims to flatten the view nesting by removing specified layouts from the visual tree.</p>
<p><a href="https://docs.microsoft.com/en-us/xamarin/xamarin-forms/user-interface/layouts/layout-compression">Layout Compression - Xamarin</a></p>
<h4>Use native HttpClient and SSL/TLS stacks</h4>
<p>By default, for compatibility reasons, Xamarin Forms uses the HTTP stack from .NET.</p>
<p>However the native stacks have increased performance and by using them help decrease the overall app size, so its recommended to switch to the native stacks.</p>
<ul><li><a href="https://docs.microsoft.com/en-us/xamarin/android/app-fundamentals/http-stack?tabs=windows">HttpClient Stack and SSL/TLS Implementation Selector for Android - Xamarin</a></li><li><a href="https://docs.microsoft.com/en-us/xamarin/cross-platform/macios/http-stack">HttpClient and SSL/TLS Implementation Selector for iOS/macOS - Xamarin</a></li></ul>
<h4>Android — Use fast renderers</h4>
<p>Due to the way the original control renderers on Android work, they have a performance implication due to each control being composed of two views.</p>
<p>To resolve this, fast renderers can be enabled which improve performance by creating fewer objects.</p>
<p><a href="https://docs.microsoft.com/en-us/xamarin/xamarin-forms/internals/fast-renderers">Xamarin.Forms Fast Renderers - Xamarin</a></p>
<h4>iOS — Use LLVM code generation engine</h4>
<p>During the build of a Xamarin Forms application, code is generated for the target platform.</p>
<p>On iOS, you can switch the code generation engine to use LLVM which produces both faster and tighter code than the Mono engine does, at the cost of longer compile times.</p>
<p><a href="https://docs.microsoft.com/en-us/xamarin/ios/deploy-test/compiling-for-different-devices?tabs=vsmac#code-generation-engine">Compiling for Different Devices in Xamarin.iOS - Xamarin</a></p>
<h3>UI</h3>
<p>This final section discusses re-usable components that can help make developing Xamarin Forms UIs easier.</p>
<h4>EffectBehavior</h4>
<p><a href="https://docs.microsoft.com/en-us/xamarin/xamarin-forms/app-fundamentals/behaviors/reusable/effect-behavior">EffectBehavior</a> in the Xamarin documentation simplifies the boilerplate code you have to write to apply an <a href="https://docs.microsoft.com/en-us/xamarin/xamarin-forms/app-fundamentals/effects/introduction">Effect</a> to a control; <a href="https://github.com/JonJam/kubemob/blob/master/KubeMob/KubeMob.Common/Behaviors/EffectBehavior.cs">kubemob’s version</a> extends it with support for adding an Effect based on a bindable condition.</p>
<p>This came in handy when adding a validation error effect to invalid entries in a form.</p>
<h4>ItemsControl</h4>
<p>If you come from a <a href="https://docs.microsoft.com/en-us/visualstudio/designers/getting-started-with-wpf?view=vs-2017">WPF</a> background, you might end up looking for an ItemsControl. There is no built in one in Xamarin Forms, however there is a <a href="https://docs.microsoft.com/en-us/xamarin/cross-platform/desktop/controls/wpf#itemscontrol">sample one</a> in the Xamarin University Infrastructure library on GitHub.</p>
<h4>WrapLayout</h4>
<p>Similarly to ItemsControl, the Xamarin University Infrastructure library also provides a <a href="https://github.com/xamarinhq/xamu-infrastructure/blob/master/src/XamU.Infrastructure/Layout/WrapLayout.cs">WrapLayout</a> implementation.</p>
<p>I hope you found these resources useful as I did and if there are any you think I have missed, please do let me know.</p>]]></content><author><name>Jonathan Harrison</name></author><category term="cross-platform" /><category term="xamarin" /><category term="xamarin-forms" /><category term="kubernetes" /><summary type="html"><![CDATA[After six months building kubemob, a Kubernetes dashboard app for Android and iOS, I share the architecture patterns, performance tips and UI components that helped most along the way.]]></summary></entry><entry><title type="html">Azure Application Insights with App Service — ENABLE ALL THE THINGS</title><link href="jonjam.github.io/blog/2018/05/16/azure-application-insights-with-app-service-enable-all-the-things.html" rel="alternate" type="text/html" title="Azure Application Insights with App Service — ENABLE ALL THE THINGS" /><published>2018-05-16T00:00:00+00:00</published><updated>2018-05-16T00:00:00+00:00</updated><id>jonjam.github.io/blog/2018/05/16/azure-application-insights-with-app-service-enable-all-the-things</id><content type="html" xml:base="jonjam.github.io/blog/2018/05/16/azure-application-insights-with-app-service-enable-all-the-things.html"><![CDATA[<p>Recently I had to diagnose an issue with an <a href="https://www.asp.net/">ASP.NET</a> web application running in <a href="https://azure.microsoft.com/en-gb/services/app-service/">Azure App Service</a>; utilising <a href="https://azure.microsoft.com/en-gb/services/application-insights/">Azure Application Insights</a>. After resolving the issue, it came to light that some of the newer features of Application Insights could have helped me work out what was going on.</p>
<p>After I went through the process of enabling these new features, I thought that I would put a list together, not only to remind myself in the future, but to help anyone else interested.</p>
<h3>Getting started</h3>
<p>As I mentioned I was working with an existing application, but if you are starting from scratch here is quick set up.</p>
<h4>Infrastructure</h4>
<p>This <a href="https://docs.microsoft.com/en-us/azure/azure-resource-manager/resource-group-overview">ARM</a> template creates an Azure App Service linked together with Azure Application Insights.</p>

<script src="https://gist.github.com/JonJam/61437a94d376601ca7dcddc45a14e817.js"></script>

<h4>Code</h4>
<p>Keeping things simple, launch Visual Studio and create a new ASP.NET Web Application (.NET Framework) and choose MVC.</p>
<p>Now we are ready to …</p>
<figure><img alt="" src="/blog/assets/images/azure-application-insights-with-app-service-enable-all-the-things-EM3uBqfXt3kQYHT1sDvGAA.jpeg"/></figure>
<h3>Infrastructure — Enable the Application Insights Profiler</h3>
<p>The <a href="https://docs.microsoft.com/en-us/azure/application-insights/app-insights-profiler">Application Insights Profiler</a> lets you view performance profiles of live requests that were served by an application. It also highlights the hot paths that use the most time.</p>
<p>This is a <a href="https://azure.microsoft.com/en-gb/blog/azure-web-sites-extensions/">site extension</a> that you can add using ARM:</p>

<script src="https://gist.github.com/JonJam/c5bc662a08849e4d51bf4cc3d5f457ad.js"></script>

<p>This extension depends upon having an App Setting named APPINSIGHTS_INSTRUMENTATIONKEY with the <a href="https://docs.microsoft.com/en-us/azure/application-insights/app-insights-create-new-resource#copy-the-instrumentation-key">Instrumentation Key</a> as its value. Putting this altogether looks as follows:</p>

<script src="https://gist.github.com/JonJam/cc4205eee7a621b0f737ba7c88b065d4.js"></script>

<p><strong>NOTE </strong>— A depends on reference to the site extension has been added to the App Settings defintion. This has been added in order that the site extension gets installed before the App Settings are applied; since App Settings changes restart the App Service and this will cause the site extension install to be cancelled.</p>
<h3>Code – Configure Application Insights</h3>
<p>The ASP.NET project needs to be <a href="https://docs.microsoft.com/en-us/azure/application-insights/app-insights-asp-net">configured with Application Insights</a> which can be done using Visual Studio.</p>
<p>Open the project with Visual Studio, and when loaded right click on the project and select the “Configure Application Insights…” option. A simple wizard should open up and just keep clicking next.</p>
<p>This wizard does the following:</p>
<ul><li>Installs the <a href="https://www.nuget.org/packages/Microsoft.ApplicationInsights.Web/">Microsoft.ApplicationInsights.Web</a> Nuget package.</li><li>Adds a configured <a href="https://docs.microsoft.com/en-us/azure/application-insights/app-insights-configuration-with-applicationinsights-config">ApplicationInsights.config</a> file.</li><li>Adds a custom <a href="https://docs.microsoft.com/en-us/azure/application-insights/app-insights-asp-net-exceptions#mvc">HandleErrorAttribute</a> to catch and log unhandled exceptions.</li><li>Configures the new attribute as a global filter.</li></ul>
<h3>Code – Configure Application Insights for Web pages</h3>
<p>Application Insights also allows monitoring at the client side which includes timings of page loads and AJAX calls, counts and details of browser exceptions and AJAX failures, as well as users and session counts.</p>
<p>To set up, you just need to add the SDK to the Shared Layout page which is detailed <a href="https://docs.microsoft.com/en-gb/azure/application-insights/app-insights-javascript">here</a>.</p>
<h3>Code – Enable Snapshot Debugging</h3>
<p>I have saved the best for last – Snapshot debugging. When this is enabled, anytime an exception occurs (say in your production web app) it automatically collects a debug snapshot.</p>
<p>You can then view this snapshot either in the Azure Portal or Visual Studio, it shows your code with all the state and variables at the moment the exception was thrown.</p>
<p>The full setup guide can be found <a href="https://docs.microsoft.com/en-gb/azure/application-insights/app-insights-snapshot-debugger">here</a>.</p>
<p>There you have it, all configured.</p>
<p>If you want a quick way to do the above at Build 2018, Microsoft announced enhancements to the Azure Portal that allow you to easily enable the Profiler and Snapshot debugging, detailed <a href="https://azure.microsoft.com/en-us/blog/enhancements-in-application-insights-profiler-and-snapshot-debugger/">here</a>.</p>
<h3>Extra– Use Release Annotations</h3>
<p>One additional thing that you can do as part of your deployment process is to use <a href="https://docs.microsoft.com/en-us/azure/application-insights/app-insights-annotations">Release Annotations</a>. Release annotations appear in Metrics graph and can make it easy to see whether recent changes have had any effect on an application’s performance</p>]]></content><author><name>Jonathan Harrison</name></author><category term="microsoft" /><category term="application-insights" /><category term="azure" /><summary type="html"><![CDATA[After a production issue that newer Application Insights features could have helped diagnose, here's my checklist for enabling them on an App Service: the Profiler, client-side monitoring and Snapshot Debugging.]]></summary></entry><entry><title type="html">C# Code Style using EditorConfig</title><link href="jonjam.github.io/blog/2018/05/01/c-code-style-using-editorconfig.html" rel="alternate" type="text/html" title="C# Code Style using EditorConfig" /><published>2018-05-01T00:00:00+00:00</published><updated>2018-05-01T00:00:00+00:00</updated><id>jonjam.github.io/blog/2018/05/01/c-code-style-using-editorconfig</id><content type="html" xml:base="jonjam.github.io/blog/2018/05/01/c-code-style-using-editorconfig.html"><![CDATA[<p>I am currently in the middle of creating a <a href="https://www.xamarin.com/">Xamarin</a> app for Android and iOS, which I will talk about more once I near completion. I just thought I would share something I discovered when setting up the project.</p>
<p>I was looking into which Code Quality tools to use for C#/Xamarin. On previous work projects I had used <a href="https://docs.microsoft.com/en-us/visualstudio/code-quality/code-analysis-for-managed-code-overview">Code Analysis</a> and <a href="https://docs.microsoft.com/en-us/visualstudio/code-quality/code-analysis-for-managed-code-overview">StyleCop</a>; but I wanted to investigate other options and really not go overboard i.e. trying to keep StyleCop errors at bay for a one man project.</p>
<p>On my way home from work I was listening to an episode of the <a href="https://dotnetrocks.com/">.NET Rocks! podcast</a> (I highly recommend it), where they were discussing <a href="https://dotnetrocks.com/?show=1534">productivity tool</a>s. One thing that stood out was that <a href="https://docs.microsoft.com/en-us/visualstudio/ide/code-styles-and-quick-actions">Visual Studio 2017’s Code Style preferences</a> (which I was already using to remind me of new C# features) supported being specified via <a href="http://editorconfig.org/">EditorConfig</a>. This meant that these settings could live alongside my code in Source Control and travel with it.</p>
<p>After some playing around, I finalized an EditorConfig that suited my preferences, and I thought would make it available as an example for anyone else interested.</p>
<h4>Example .editorconfig</h4>
<p>Code Style preferences come in three categories:</p>
<ul><li>Language conventions</li><li>Formatting conventions</li><li>Naming conventions</li></ul>
<p>I have specified all the Language and Formatting conventions currently available, and included some Naming conventions which could be expanded to include rules likes private fields must start with _.</p>

<script src="https://gist.github.com/JonJam/142e83558e55be87f20c6277df5a1748.js"></script>

<p>The one thing to note though is that these rules aren’t enforced by Continuous Integration builds, so other tools like <a href="https://docs.microsoft.com/en-us/visualstudio/code-quality/roslyn-analyzers-overview">Roslyn Analyzers</a> need to be used to perform build time checks. One example is <a href="https://github.com/SonarSource/sonar-csharp/tree/master/sonaranalyzer-dotnet">SonarAnalyzer</a>.</p>]]></content><author><name>Jonathan Harrison</name></author><category term="csharp" /><category term="microsoft" /><category term="visual-studio" /><category term="dotnet" /><summary type="html"><![CDATA[Visual Studio 2017's code style preferences can be defined in an EditorConfig file, so they live in source control alongside your code. Here's the example I settled on for my Xamarin project.]]></summary></entry></feed>